相关术语:
- UIKit is the iOS user interface toolkit.
- IB is Interface Builder.
- CA is Core Animation. Like CALayer is a Core Animation data type responsible for managing the way your view looks. Core Animation handles animation.
- CG is Apple’s Core Graphics framework. Like CGColor. Core Graphics handles drawing.
- KVO is key-value observing.
- NS is Next Step. Steve Jobs did lots.
- VFL is a technique called Auto Layout Visual Format Language.
- GCD is Grand Central Dispatch.
- FIFO is First In, First Out.
- MK is Mapkit.
- NS came from the NeXTSTEP libraries Foundation and AppKit(those names are still used by Apple’s Cocoa frameworks).
- UN is UserNotification.
- CL is CoreLocation.
- MC is Multipeer Connectivity.
- CM is Core Motion.
- LA is the Local Authentication framework.
- HSB is Hue, Saturation and Brightness. Using this method of creating colors you specify values between 0 and 1 to control how saturated a color is (from 0 = gray to 1 = pure color) and brightness (from 0 = black to 1 = maximum brightness), and 0 to 1 for hue. “Hue” is a value from 0 to 1 also, but it represents a position on a color wheel, like using a color picker on your Mac. Hues 0 and 1 both represent red, with all other colors lying in between.
- CK is CloudKit.
- XCTest may be XCode Test.
String
A string is a collection of character.
1 | let pizzaJoint = "café pesto" |
NSAttributedString
Attributed strings are made up of two parts: a plain Swift string, plus a dictionary containing a series of attributes that describe how various segments of the string are formatted.
NSAttributedString可以针对一串字符串,片段化地设置其的属性,而Label却只能整个设置。
我们在使用UILabel, UITextField, UITextView, UIButton, UINavigationBar等等支持text属性的情况下,更建议使用attributedText。
1 | NSAttributedString(string: String, attributes: [NSAttributedString.Key: Any]?) |
The examples are in codes below.
NSAttributedString.Key – 一般用法
NSAttributedString.Key is the attributes that you can apply to text in an attributed string.
1 | import UIKit |
效果是这样的:
虽然我们可以在Label中设置字符串的属性,但你不能对该字符串的不同部分设置不同的属性,而NSAttributedString可以做到。
NSMutableAttributedString(string: String)
可更改属性的NSString,即使你使用let来定义,如下:
1 | let string = "This is a test string" |

tips:两个NSAttributedString如何使用append相加?
答:无法相加。但是,一个可以设置成NSMutableAttributedString,去append另一个NSAttributedString即可。
NSAttributedString.Key – 的其他属性
There are lots of formatting options for attributed strings, including:
- Set .underlineStyle to a value from NSUnderlineStyle to strike out characters.
- Set .strikethroughStyle to a value from NSUnderlineStyle (no, that’s not a typo) to strike out characters.
- Set .paragraphStyle to an instance of NSMutableParagraphStyle to control text alignment and spacing.
- Set .link to be a URL to make clickable links in your strings.
1 | attributedString.addAttribute(.link, value: "https://www.google.com", range: NSRange(location: 0, length: attributedString.length)) |

案例-使段落文字居中,文字大小根据手机设置的字体自动匹配更改
1 | func centeredAttributedString(_ string: String, fontSize: CGFloat) -> NSAttributedString { |
FileManager
枚举程序设备目录内的所有文件
1 | let fm = FileManager.default |
Bundle
Bundle.main.url(forResource:) – 仅通过文件名而返回该文件的url
Finding a path to a file is something you’ll do a lot, because even though you know the file is called “start.txt” you don’t know where it might be on the filesystem. So, we use a built-in method of Bundle to find it: path(forResource:). This takes as its parameters the name of the file and its path extension, and returns a String? – i.e., you either get the path back or you get nil if it didn’t exist.
1 | // 假设要找寻到start.txt这个文件 |
Bundle.main.urls(forResourcesWithExtension: String?, subdirectory: String?) – 从直接指定文件名及具体目录名称来找所有文件
如果我在某个项目目录中放了一些文件,这些文件都放在Cards.bundle目录的子目录Characters中,且不指定文件的名称和后缀:
1 | let urls = Bundle.main.urls(forResourcesWithExtension: nil, subdirectory: "Cards.bundle/Characters") |
subdirectory目录必须是详细具体的。
URL的lastPathComponent返回文件名
上例来说:
1 | print(urls?[0].lastPathComponent) |
NSObject
NSObject is what’s called a universal base class for all Cocoa Touch classes. That means all UIKit classes ultimately come from NSObject, including all of UIKit.
Data
Data(contentsOf: URL)
从特定url取得数据
1 | override func viewDidLoad() { |
Data.write(to:)
下面是通过UIImagePickerController取得照片后写入本地的一个例子:
见 UIImagePickerController –> 一般示例代码 跳转到
Data 与 String 的转换
1 | // 初始的字符串 |
UIView
UIView是UIKit框架里面最基础的视图类,UIView类定义了一个矩形的区域,并管理该区域内的所有屏幕显示。
UIView is the parent class of all of UIKit’s view types: labels, buttons, progress views, and more.
程序启动后,创建的第一个视图就是UIWindow,接着创建视图控制器的view,并把view放到UIWindow上,于是控制器的view就显示在屏幕上了。
所以我们可以这样使用UIView():
1 | override func loadView() { |
Previously we assigned a WKWebView instance directly as our view, meaning that it automatically took up all the space. Here, though, we’re going to be adding lots of child views and positioning them by hand, so we need a big, empty canvas to work with.
下面是在一个UIView()的基础上再添加一个UIView()
1 | // buttonsView是为了后续添加大量UIButton进行显示的一个容器view |
tintColor
任何UIView子类的tintColor属性,可以改变应用在其上的颜色效果,但具体什么效果,取决于你应用在什么上面。
在navigationBar和tab bars上面,意味着改变button上的text和icons的颜色;
在text views上面,意味着改变被选择和高亮的text部分的颜色;
在progress bars上面,意味着改变它的track color(这是不是progress前半进程的颜色?)的颜色。
在tableView的cell上面,改变的就是在editing模式下,选择区域的颜色,具体见tableView的tintColor一块的笔记。
设置单个页面的tintColor
1 | override func viewDidLoad() { |
frame.size – 查看UIView的框架大小
view.frame.size.width view.frame.size.height
layoutMargins属性 – 查看Margins的大小
通过查看一个view的layoutMargins属性,返回的结果是:UIEdgeInsets(top: 8.0, left: 8.0, bottom: 8.0, right: 8.0)
这时候就可以查看或者修改 top/left/bottom/right 等的值了。
设置项目中所有views的tint – 需要在AppDelegate.swift中设置
AppDelegate.swift:
1 | func application(_ application: UIApplication, didFinishLaunchingWithOptions launchOptions: [UIApplication.LaunchOptionsKey: Any]?) -> Bool { |
UITapGestureRecognizer – 点击响应事件
实例1:(拿UIImageView示例)
1 | // 创建一个UITapGestureRecognizer的事件响应函数 |
1 | // 创建UITapGestureRecognizer实例 |
1 | // @IBOutlet var imageView: UIImageView! |
实例2:(拿UILabel示例)
1 | // 创建UITapGestureRecognizer实例 |
1 | // @IBOutlet var label: UILabel! |
Adding a gesture recognizer to a UIView
向某个UIView添加手势识别
在一个Controller’s View中,我们想让某个UIView能够识别一个“pan gesture”(平移手势),我们可以在设置这个UIView的变量属性中,添加一个property observer,具体如下:
1 | @IBOutlet weak var pannableView: UIView { |
UITapGestureRecognizer 的另一示例
1 | let recognizer = UITapGestureRecognizer(target: self, action: #selector(webViewTapped)) |
UIView的draw()作画机制
你可以自己在UIView中自己去作画,这时候就会用到draw(),即override func draw(_ rect: CGRect) { }
简单的例子:
1 | class PlayingCardView: UIView { |

setNeedsDisplay() – 告诉系统重写界面
setNeedsDisplay() – Marks the receiver’s entire bounds rectangle as needing to be redrawn.
调用这个方法,实际上就是让这个UIView去执行override func draw(_ rect: CGRect) { }
setNeedsLayout() – 告诉系统subViews也需要重写
看到教程是setNeedsDisplay()和setNeedsLayout()先后一起执行的。
1 | var rank: Int = 5 { |
调用这个方法,实际上就是让这个UIView去执行override func layoutSubviews() { }
override func traitCollectionDidChange(_ previousTraitCollection: UITraitCollection?) { }
It is called when the iOS interface environment changes. 比如手机的字体设置中换成了超大字体,那么程序就会调用该方法。
1 | override func traitCollectionDidChange(_ previousTraitCollection: UITraitCollection?) { |
UITableViewController
IndexPath(row: Int, section: Int)
let indexPath = IndexPath(row: 1, section: 0)
需要实现的方法
override func tableView(_ tableView: UITableView, numberOfRowsInSection section: Int) -> Int { }
override func tableView(_ tableView: UITableView, cellForRowAt indexPath: IndexPath) -> UITableViewCell { }
1 | override func tableView(_ tableView: UITableView, cellForRowAt indexPath: IndexPath) -> UITableViewCell { |
如果tableView没有在storyBoard中设置过cell可复用的情况
1 | var cell: UITableViewCell! = tableView.dequeueReusableCell(withIdentifier: "Cell") |
一般我们使用上面的代码,先查看storyBoard中是否设置过cell可复用的情况,则会使用cell = UITableViewCell(style: .default, reuseIdentifier: "Cell"),但会带来一个问题,每次tableView都会新建一个cell,而不是复用,这对于资源的消耗是很大的。
解决办法:
1 | // 在ViewDidLoad()中注册可复用的cell |
这样即使你在storyBoard中没有设置过,也可以高效率的使用了。
可以实现的方法
override func tableView(_ tableView: UITableView, didSelectRowAt indexPath: IndexPath) { }
1 | override func tableView(_ tableView: UITableView, didSelectRowAt indexPath: IndexPath) { |
override func tableView(_ tableView: UITableView, commit editingStyle: UITableViewCell.EditingStyle, forRowAt indexPath: IndexPath) { }
可以划动删除/添加的操作。(在模拟器上没有成功,但在真机上向左划动会出现”删除”字样。)
1 | override func tableView(_ tableView: UITableView, commit editingStyle: UITableViewCell.EditingStyle, forRowAt indexPath: IndexPath) { |
tableView.layoutMargins / tableView.separatorInset / UIEdgeInsets – 修改边缘的空白空间的大小
未设置前: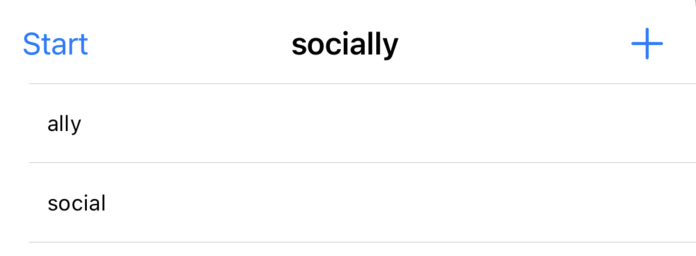
在viewDidLoad()中加入代码:
1 | // tableView.layoutMargins -- the default spacing to use when laying out content in the view. |
在tableView的cellForRowAt方法中加入代码:
1 | // 这里是给每个cell设置layoutMargins |
设置后的效果: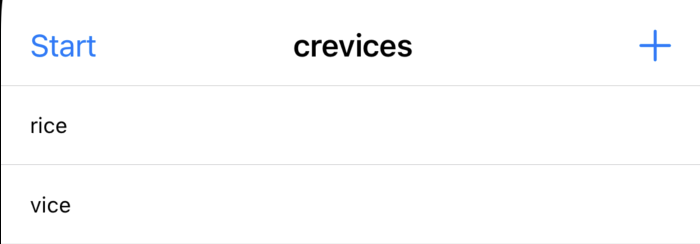
tableView.backgroundColor – 设置tableView的底色
将某张图片设置tableView的底色,并编排该底色
1 | if let backgroundImage = UIImage(named: "white_wall") { |
tableView.allowsMultipleSelection – 除了编辑状态下,允许多行选定
1 | tableView.allowsMultipleSelection = true |
tableView.allowsMultipleSelectionDuringEditing – 编辑状态下允许多行选定
1 | tableView.allowsMultipleSelectionDuringEditing = true |
tableView.reloadData()
Reloads the rows and sections of the table view:
1 | tableView.reloadData() |
tableView.reloadRows(at: [IndexPath], with: UITableView.RowAnimation)
Reloads the specified rows using the provided animation effect.
1 | tableView.reloadRows(at: [indexPath], with: .none) |
override func setEditing(_ editing: Bool, animated: Bool) {} – 默认
这是个默认在tableView中会实现的方法,一般不需要去修改它。
比如你定义了一个UIBarButtonItem:
1 | editButton = UIBarButtonItem(barButtonSystemItem: .edit, target: self, action: #selector(enterEditingMode)) |
若点击该edit的button,就会自动调用到setEditing方法。
setEditing(true, animated: true) – 就是出现editing模式;
setEditing(false, animated: true) – 就是取消editing模式。
那么,什么时候需要覆写该setEditing方法呢?
比如当你想点击该edit按钮后,你想让toolbarItems出现你自定义的按钮,包括你想取消editing模式时,又出现toolbarItems自定义的其他按钮,那你就可以去使用它,但每次覆写都必须实现super.setEditing(editing, animated: animated):
1 | // 点击edit按钮调用的方法: |
tableView.isEditing – 反映tableView是否在editing模式
tableView.isEditing is a boolean value that determines whether the table view is in editing mode.
例子请结合 tableView.indexPathsForSelectedRows 一起看。
tableView.indexPathsForSelectedRows
The index paths that represent the selected rows. 就是一个所有被选中cell的index列表。
1 | override func tableView(_ tableView: UITableView, didDeselectRowAt indexPath: IndexPath) { |
tableView.indexPathForSelectedRow – 返回被选中列的IndexPath
cell.selectedBackgroundView – 设置cell在选中状态下的背景view
1 | // cell: UITableViewCell |
cell.multipleSelectionBackgroundView – 设置cell在被多选状态下的背景view
1 | // cell: UITableViewCell |
UITableViewCell.tintColor – cell在editing模式下选择区域的背景颜色
1 | // cell: UITableViewCell |

tableView.rowHeight – 设置tableView的每个cell的高度
tableView.rowHeight = 90
tableView.separatorStyle – 设置每个cell的分隔类型
tableView.separatorStyle = .singleLinetableView.separatorStyle = .none
UITableViewDataSource – protocol
具体实例参考:
github上clarknt写的关于100daysOfswift的Milestone-Project28-30的实例代码。
从代码实例中的一些思考:
主页面push出一个setting页面,setting页面内有两个tableView,所以在setting页面需要识别tableView是哪一个,而两个tableView分别有1个section和26个section,所以在UITableViewDataSource协议的实现方法中要手动去识别区分是哪个table。
学习到的是,以前写UITableView的时候,从来没有去实现过UITableViewDataSource协议。
必须要实现的方法: numberOfRowsInSection cellForRowAt
可选择实现的方法1:numberOfSections – 确定有多少个分区(section)
例如:
1 | func numberOfSections(in tableView: UITableView) -> Int { |
可选择实现的方法2:titleForHeaderInSection – 每个section的标题
例如:
1 | func tableView(_ tableView: UITableView, titleForHeaderInSection section: Int) -> String? { |
可选择实现的方法3:titleForFooterInSection – 每个section的脚标
可选择实现的方法4:canMoveRowAtIndexPath – 用来控制cell是否可以移动,只有实现了才行移动。
numberOfSections
1 | override func numberOfSections(in tableView: UITableView) -> Int { |
UIImage
生成UIImage的方法
UIImage(named:)
1 | let imageName = "nssl0042.jpg" |
UIImage(named:)和UIImage(contentsOfFile:)的区别
UIImage(named:)可以不写明图片文件的具体路径,UIImage(contentsOfFile:)必须要写明图片文件的具体路径,这个比较麻烦,但我们可以这样:
1 | let path = Bundle.main.path(forResource: imageName, ofType: nil)! |
此外,最重要的一个区别,也是会影响到app性能的一个区别就是:UIImage(named:)加载完图片后会加入缓存,而UIImage(contentsOfFile:)并不会加入缓存。那么前者加载图片会比较快,而后者会比较慢,但前者会占据大量缓存,加载大量图片后,可能会让缓存吃紧,而后者就不会出现这种情况。
UINavigationController
Declaration:
1 | class UINavigationController : UIViewController |
title - 标题
直接在页面使用 title = “ I’m the title, etc. “ 即可。
largeTitle
在UINavigationController中,title的default style都是small text,那么如何设置成largeTitle呢?
1 | navigationController?.navigationBar.prefersLargeTitles = true |
以上。
那么,一些类似detail的页面不需要largeTitle而主页面需要的情况下,该怎么设置呢?
只要在detail页面加入代码:
1 | navigationItem.largeTitleDisplayMode = .never |
以上。
UINavigationBar
By default, a UINavigationController has a bar across the top, called a UINavigationBar, and as developers we can add buttons to this navigation bar that call our methods.
1 | navigationItem.rightBarButtonItem = UIBarButtonItem(barButtonSystemItem: .action, target: self, action: #selector(shareTapped)) |
这里选择的是barButtonSystemItem: .action, 可以选择其他的,比如 .cancel / .done / .add / .camera /.bookmarks /.edit 等等很多其他的。
还可以让图标自定义显示:
1 | navigationItem.leftBarButtonItem = UIBarButtonItem(title: "Score", style: .plain, target: self, action: #selector(showScore)) |
该自定义的图标可设置样式:
1 | navigationItem.leftBarButtonItem.setTitleTextAttributes([NSAttributedString.Key.font: .systemFont(ofSize: 11), NSAttributedString.Key.foregroundColor : UIColor.darkText], for: .normal) |
navigationItem.backBarButtonItem
点击rightBarButton出现跳转页面后,才会出现的BarButton。
1 | navigationItem.rightBarButtonItem = UIBarButtonItem(barButtonSystemItem: .add, target: self, action: #selector(addWhistle)) |
点击页面即隐藏或显示navigationBar
1 | override func viewWillAppear(_ animated: Bool) { |
在显示该页面时,即开启点击页面任何处可隐藏navigationBar,再点击可显示navigationBar的功能。
但为何在viewWillDisappear中还要取消该功能?
想想这样的场景,在detail页面可观看一张图片,点击可显示/隐藏navigationBar,但如果你点击返回退回到前一页(可能是主页面),该页面并不需要隐藏navigationBar,但却在navigationController中开启了该功能,会非常的不好,所以需要取消。
UIActivityIndicatorView – 呈现loading转圈的状态
1 | let spinner = UIActivityIndicatorView(style: .large) |

Disclosure Indicator
Disclosure Indicator 即如下图每个cell右边的箭头(>)符号: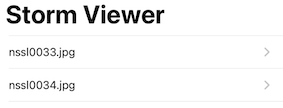
如何设置显示或不显示:
在storyBoard中选中cell,在其的属性中的Accessory中去设置: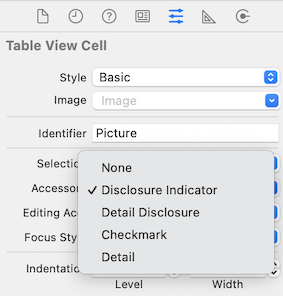
可以看到我们选择的是DisclosureIndicator,还有DetailDisclosure/Checkmark/Detail都是很好的选择,主要看所使用的场景。
UINavigationController? 的 popViewController / pushViewController
UINavigationController是IOS编程中的一个view controller的容器,通过栈管理viewControllers,每一次pushViewController操作都将在栈顶添加一个view controller,然后通过popViewController将该栈最顶端的controller移除。
上面说的栈最顶端是这样的,navigationController?.viewControllers中保存着所有的view controller,你push进去一个view controller,就放在这个列表的最后面,你pop的话,也是将列表的最后面那个view controller删除。这就是栈的后进先出的概念。
这里自己写了个例子:
1 | // ViewController.swift |
UIButton
设置UIButton上的文字 – .setTitle()
1 | let submit = UIButton(type: .system) |
在UIButton上设置UIImage
1 | // 前提是,button1是UIButton类型的按钮 |
设置UIButton的边框粗细
1 | button1.layer.borderWidth = 1 |
our border will be 1 pixel on non-retina devices, 2 pixels on retina devices, and 3 on retina HD devices.
设置UIButton的边框颜色
1 | button1.layer.borderColor = UIColor.lightGray.cgColor |
By default, the border of CALayer is black, but you can change that if you want by using the UIColor data type. I said that CALayer brings with it a little more complexity, and here’s where it starts to be visible: CALayer sits at a lower technical level than UIButton, which means it doesn’t understand what a UIColor is. UIButton knows what a UIColor is because they are both at the same technical level, but CALayer is below UIButton, so UIColor is a mystery.
Don’t despair, though: CALayer has its own way of setting colors called CGColor, which comes from Apple’s Core Graphics framework. This, like CALayer, is at a lower level than UIButton, so the two can talk happily – again, as long as you’re happy with the extra complexity.
Even better, UIColor (which sits above CGColor) is able to convert to and from CGColor easily, which means you don’t need to worry about the complexity.
以上的颜色也可以写成这种表现形式:
1 | UIColor(red: 1.0, green: 0.6, blue: 0.2, alpha: 1.0).cgColor |
设置UIButton的大小
1 | let letterButton = UIButton(type: .system) |
通过IB来创建UIButton的Action方法
https://www.hackingwithswift.com/read/2/5/from-outlets-to-actions-creating-an-ibaction
在IB中通过ctrl拉动UIButton按钮至assistant页面中,跳出页面选项选择Connection:Action而非Connection:Outlet。
会生成按钮点击的@IBAction方法:
1 | @IBAction func buttonTapped(_ sender: UIButton) { |
通过此方法,可以使多个按钮使用同一方法的情况。
注意:有可能上面的sender的属性是Any,这时候最好把Any改成UIButton。
如何在多个按钮使用同一方法的情况下,识别是哪个按钮被点击?
在IB界面的这个UIButton属性中设置其的tag为一个唯一的数字: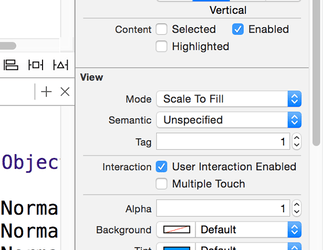
随后在这个UIButton按钮的action中可查看其的tag:
1 | @IBAction func buttonTapped(_ sender: UIButton) { |
sender.isHidden 的Bool值 让UIButton隐身
在 @IBAction func buttonTapped(_ sender: UIButton) { 中
设置sender.isHidden = true 或者 false 可让该UIButton隐藏或显示。
通过代码来给UIButton()添加action
1 | let submit = UIButton(type: .system) |
让UIButton()隐藏但仍占据位置
1 | let submit = UIButton(type: .system) |
UIAlertController
一般使用
1 | let ac = UIAlertController(title: title, message: "Your score is \(score).", preferredStyle: .alert) |
Apple recommends you use .alert when telling users about a situation change, and .actionSheet when asking them to choose from a set of options.
像下面这样的方式 (preferredStyle: .actionSheet)

1 | navigationItem.rightBarButtonItem = UIBarButtonItem(title: "Open", style: .plain, target: self, action: #selector(openTapped)) |
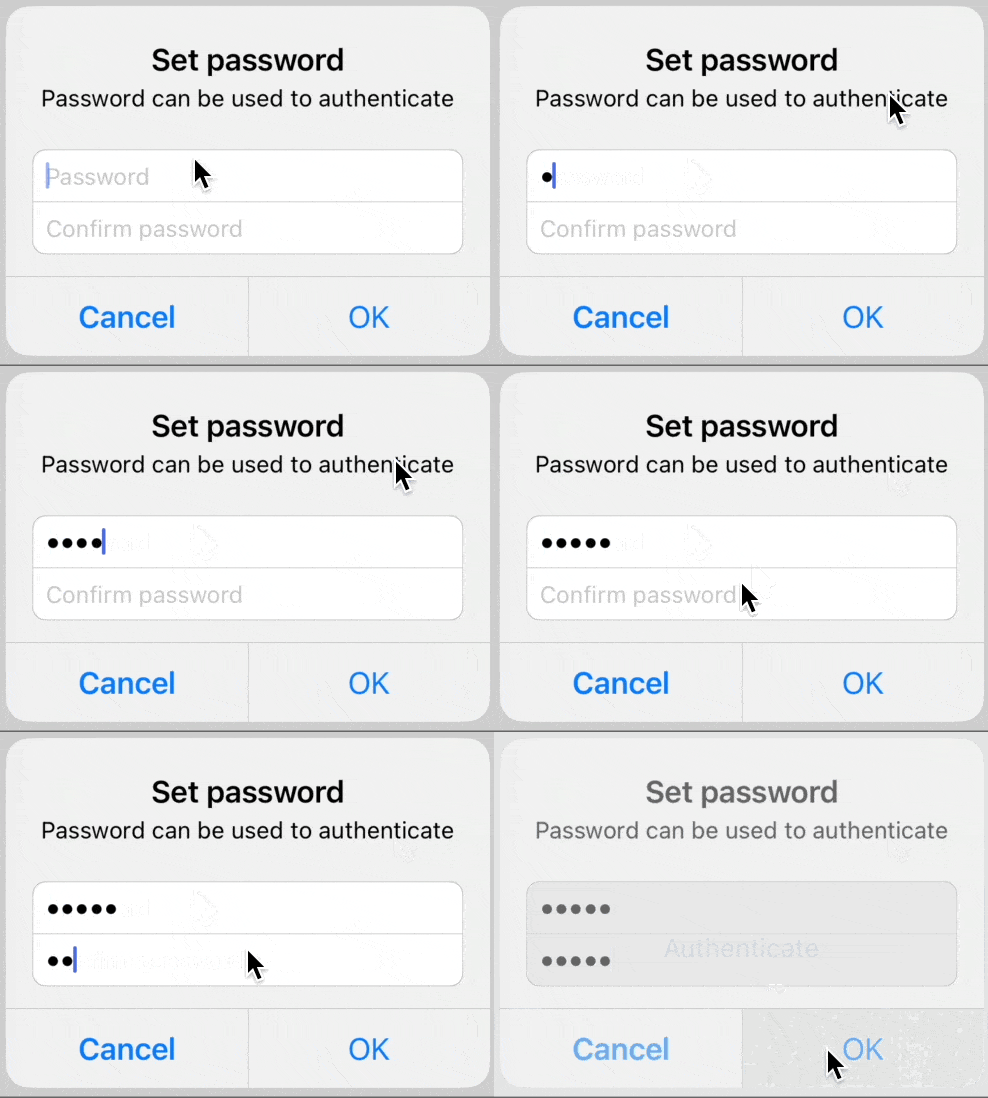
添加TextField文本框供输入
1 | @objc func promptForAnswer() { |
ac.addTextField(configurationHandler: <#T##((UITextField) -> Void)?##((UITextField) -> Void)?##(UITextField) -> Void#>)
下面是当注册需要设置密码时的例子:
1 | ac.addTextField { textField in |
UIActivityViewController
UIActivityViewController will automatically give us functionality to share by iMessage, by email and by Twitter and Facebook, as well as saving the image to the photo library, assigning it to contact, printing it out via AirPrint, and more. It even hooks into AirDrop and the iOS extensions system so that other apps can read the image straight from us.
1 | navigationItem.rightBarButtonItem = UIBarButtonItem(barButtonSystemItem: .action, target: self, action: #selector(shareTapped)) |
若选择Save Image,还需要编辑Info.plist
在Info.plist中添加row,选择 “Privacy - Photo Library Additions Usage Description”, 添加String值类似“We need to save photos you like.”
UIToolbar
UIToolbar holds and shows a collection of UIBarButtonItem objects that the user can tap on.

1 | let spacer = UIBarButtonItem(barButtonSystemItem: .flexibleSpace, target: nil, action: nil) |
toolbar的样式设定
1 | guard let toolbar = navigationController?.toolbar else { return } |
WKWebView
import
1 | import WebKit |
正常使用
1 | class ViewController: UIViewController, WKNavigationDelegate { |
使用webView加载内容,并显示出来
显示效果是类似这样的:
1 | import UIKit |
webView可实现的方法
func webView(_ webView: WKWebView, didFinish navigation: WKNavigation!) { }
1 | func webView(_ webView: WKWebView, didFinish navigation: WKNavigation!) { |
可实现网页显示标题
func webView(_ webView: WKWebView, decidePolicyFor navigationAction: WKNavigationAction, decisionHandler: @escaping (WKNavigationActionPolicy) -> Void) { }
1 | func webView(_ webView: WKWebView, decidePolicyFor navigationAction: WKNavigationAction, decisionHandler: @escaping (WKNavigationActionPolicy) -> Void) { |
这方法就像是网页浏览器的过滤器,任何url都会在这边过滤一下,最终决定是decisionHandler(.allow)运行呢,还是decisionHandler(.cancel)拒绝呢。
UIProgressView
UIProgressView is a colored bar that shows how far a task is through its work, sometimes called a “progress bar.”
实际案例 + 使用到addObserver/observeValue这两个观察者/处理者(即KVO)
通过网页的加载进度,直接反映在UIProgressView进度条上:
https://www.hackingwithswift.com/read/4/4/monitoring-page-loads-uitoolbar-and-uiprogressview
1 | var progressView: UIProgressView! |
UITextChecker
UITextChecker类来源于UIKit,在SwiftUI没有替代方案的情况下,只能使用该方法了。
使用的案例(简单实现,下面的NSRange和rangeOfMisspelledWord又会重复一遍这个操作):
查找用户输入的英语单词是否在字典里,有没有拼错的情况:
1 | import UIKit |
方法的解释可以参考下面的文章:
https://www.hackingwithswift.com/books/ios-swiftui/working-with-strings
https://www.hackingwithswift.com/books/ios-swiftui/validating-words-with-uitextchecker
注意:
UITextChecker uses the built-in system dictionary.我们不用为其特意准备单词表等文档。
Auto Layout 自动页面布局的设置
通过Storyboard来设置
https://www.hackingwithswift.com/read/6/2/advanced-auto-layout
以上是三面国旗间如何通过storyboard来自动设置布局,以让起在portrait/landscape中均能够有一个好的效果。
通过该视频就能大致了解了,而看文字的话比较繁琐。
通过Storyboard自动布局后如何让它变为自动布局
在Storyboard中布局各个view后,可以让屏幕自动布局页面,这样在landscape或是不同屏幕大小的机型上,都可以自动适应布局:
- Select the view controller by clicking on “View Controller” in the document outline,
- then go to the Editor menu
- and choose Resolve Auto Layout Issues > Reset To Suggested Constraints.
通过Storyboard布局后,如何让一个view在Storyboard上回到它应该显示的位置上?
我们在Storyboard上扔下一个UILabel,让其显示”Here is a UILbale !”,字体设置为30,随后通过鼠标contrl指向空白处,此时选择”Center Horizontally in safe area” / “Center Vertically in safe area”,随后鼠标点击该label,我们看的是: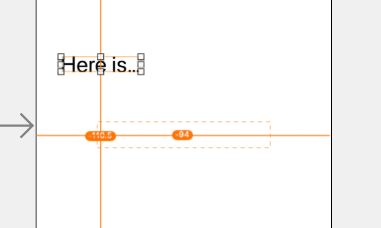
我们来分析一个这个图:
可以看到实线包围的label和一个虚线包围的label。实线的(the solid orange lines)代表你的label现在在的位置,而虚线的(the dashed orange lines)代表程序运行后你的label会在的位置。
那么如何让这个label回到它在程序运行后应该在的位置呢?
Editor menu and choosing Resolve Auto Layout Issues > Update Frames
设置后是这样的: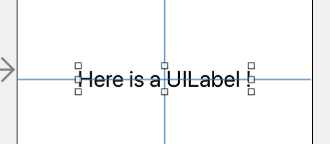
这样就这样了,没有橙线了。
通过addConstraints with Visual Format Language (VFL)
一个不通过Storyboard可视化布局来显示页面的简单例子:
(因为之前有执念一直在想有没有办法能够实现,所以一知道怎么做了,就写进了笔记里)
1 | override func viewDidLoad() { |
这里之前一直想随便写个view让其能够显示,始终没有显示,后来发觉是因为没有这行代码:
1 | imageView.translatesAutoresizingMaskIntoConstraints = false |
because by default iOS generates Auto Layout constraints for you based on a view’s size and position. We’ll be doing it by hand, so we need to disable this feature.
Q: 为什么 imageView.translatesAutoresizingMaskIntoConstraints = true 的时候就没有显示这个view呢?
A: I have no answer…….
详细一点的例子:
1 | // 首先是 五个label图像元素 |
现在这些图像都挤在左上角!还互相叠着!
设置一个dict:
1 | let viewsDictionary = ["label1": label1, "label2": label2, "label3": label3, "label4": label4, "label5": label5] |
添加布局:
1 | for label in viewsDictionary.keys { |
NSLayoutConstraint.constraints(withVisualFormat:)相对比较关键。
里面的用字符串表示的”H:|[label1]|”中,H代表Horizontal,前后的两个|分别代表了屏幕的左右边缘。
看懂下面的代码:
1 | view.addConstraints( NSLayoutConstraint.constraints(withVisualFormat: "V:|[label1]-[label2]-[label3]-[label4]-[label5]", options: [], metrics: nil, views: viewsDictionary)) |
5个label按照次序沿着屏幕左侧开始依次排列。其中分隔每个label的符号”-“意味着有间隔,这个间隔的默认值是10,可以自定义。
以及设置更精确的数据:
1 | view.addConstraints( NSLayoutConstraint.constraints(withVisualFormat: "V:|[label1(==88)]-[label2(==88)]-[label3(==88)]-[label4(==88)]-[label5(==88)]-(>=10)-|", options: [], metrics: nil, views: viewsDictionary)) |
以及使用到metrics参数的情况:
1 | let metrics = ["labelHeight": 88] |
So when your designer / manager / inner-pedant decides that 88 points is wrong and you want some other number, you can change it in one place to have everything update.
以及使用优先级priority的情况:(优先级是从1-1000,数字越大优先级越高) - @数字
1 | "V:|[label1(labelHeight@999)]-[label2(label1)]-[label3(label1)]-[label4(label1)]-[label5(label1)]->=10-|" |
自己理解:label1设置了一个高度,并对该高度设置了一个优先级,那么其他四个label的高度和其一样(包括优先级)。
通过Auto Layout anchors来自动布局
Every UIView has a set of anchors that define its layouts rules.
The most important ones are
widthAnchor, heightAnchor, topAnchor, bottomAnchor, leftAnchor, rightAnchor, leadingAnchor, trailingAnchor, centerXAnchor, and centerYAnchor.
一般用例:
1 | for label in [label1, label2, label3, label4, label5] { |
一般用例:
1 | if let previous = previous { |
这里用到的view.safeAreaLayoutGuide其实理解下来就是除了上下那两块的其他安全区域的屏幕范围。
还有这样的:
1 | yourView.widthAnchor.constraint(equalTo: view.safeAreaLayoutGuide.widthAnchor, multiplier: 0.5, constant: 50).isActive = true |
就是在0.5倍的基础上再加50的意思。
还可以用到NSLayoutConstraint.activate集合很多规则:
1 | NSLayoutConstraint.activate([ |
Notice the way I’m pinning the label to view.layoutMarginsGuide – that will make the score label have a little distance from the right edge of the screen.
yourView.setContentHuggingPriority(UILayoutPriority(Int), for: )
1 | cluesLabel.setContentHuggingPriority(UILayoutPriority(1), for: .vertical) |
优先级是从1-1000的,此处设置为1,代表最没有优先级,for是指适用于垂直面的。
创建的Game项目的屏幕大小layout的适配
https://www.hackingwithswift.com/read/14/2/getting-up-and-running-skcropnode
创建了一个Game项目,之前教程中均是使用spriteKit来制作的,一般都会设置屏幕大小为1024*768,这在一般iPad上都没问题,11-inch iPad Pro会比较特殊,所以需要做一个适配:
在GameViewController.swift中,将
“scene.scaleMode = .aspectFill”
替换成
“scene.scaleMode = .fill”
UIEdgeInsets – 类似于给UIView加一个padding的设置
我们创建一个UITextView:
1 | @IBOutlet var textView: UITextView! |
并在storyboard上设置了它的大小,执行后是这样的: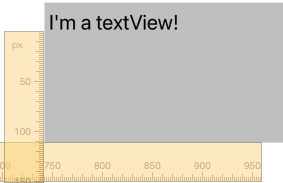
如果我们给它加上Inset:
1 | textView.contentInset = UIEdgeInsets(top: 50, left: 50, bottom: 50, right: 50) |
它就会是这样: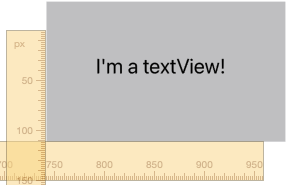
UITabBarController
如何更改Tabbar的显示文字和图标
假设3个页面依次嵌套是这样的:
View Controller Scene – Navigation Controller Scene – Tab Bar Controller Scene
如何更改Tabbar的显示文字和图标?
需要在Storyboard中找到Navigation Controller Scene(而非Tab Bar Controller Scene),随后选到这个Tabbar元素(a new type of object called a UITabBarItem),再右侧属性栏的Bar Item中去更改其的Title和Image。
如何增加Tab页面
https://www.hackingwithswift.com/read/7/5/finishing-touches-didfinishlaunchingwithoptions
打开AppDelegate.swif,找寻到didFinishLaunchingWithOptions方法,在里面添加如下代码,最终的代码是:
1 | func application(_ application: UIApplication, didFinishLaunchingWithOptions launchOptions: [UIApplication.LaunchOptionsKey : Any]? = nil) -> Bool { |
随后,如何在相同的一个ViewControllerScene中区别开是哪个tab页面?
1 | let urlString: String |
UIFont
根据用户在手机设置中的字体大小来自动调节
1 | var font = UIFont.preferredFont(forTextStyle: .body).withSize(fontSize) |
UILabel()
1 | scoreLabel = UILabel() |
UITextfield
1 | currentAnswer = UITextField() |
注意:UITextField只能显示一行,而UITextView可以显示多行,这就是两者的区别。
UITextView
UITextView可以显示多行,而UITextField只能显示一行,这就是两者的区别。
UITextView.contentInset – 类似于一个padding
具体操作见 “Auto Layout 自动页面布局的设置” -> “UIEdgeInsets” 。
UITextView.endEditing(true/false) – 隐藏/显示 keyboard
1 | // textView: UITextView |
UITextView的resignFirstResponder()
就是取消focus,让键盘隐藏的作用。
This is used to tell a view that has input focus that it should give up that focus. Or, in Plain English, to tell our text view that we’re finished editing it, so the keyboard can be hidden.
1 | @objc func saveSecretMessage() { |
UITextView的delegate
UITextView的delegate需要遵循UITextViewDelegate协议。
这样当用户在UITextView中开始输入时,就会向func textViewDidBeginEditing(_ textView: UITextView) {}方法
传输信息。
GCD - Grand Central Dispatch
GCD是帮助你自动化管理进程的一套东西。GCD中的三个方法之一,最重要的就是async()。
后台进程中,有四种选择,或者叫QoS level set:
- User Interactive: this is the highest priority background thread, and should be used when you want a background thread to do work that is important to keep your user interface working. This priority will ask the system to dedicate nearly all available CPU time to you to get the job done as quickly as possible.
- User Initiated: this should be used to execute tasks requested by the user that they are now waiting for in order to continue using your app. It’s not as important as user interactive work – i.e., if the user taps on buttons to do other stuff, that should be executed first – but it is important because you’re keeping the user waiting.
- The Utility queue: this should be used for long-running tasks that the user is aware of, but not necessarily desperate for now. If the user has requested something and can happily leave it running while they do something else with your app, you should use Utility.
- The Background queue: this is for long-running tasks that the user isn’t actively aware of, or at least doesn’t care about its progress or when it completes.
Those QoS queues affect the way the system prioritizes your work: User Interactive and User Initiated tasks will be executed as quickly as possible regardless of their effect on battery life, Utility tasks will be executed with a view to keeping power efficiency as high as possible without sacrificing too much performance, whereas Background tasks will be executed with power efficiency as its priority.
如何使用:
1 | // 在默认的Background queue进程中 |
1 | // 指定在User Initiated进程中 |
此外,在 async() 里面的代码不需要使用[weak self] in之类的语句,因为async()执行完就会被丢弃,不存在留存东西的情况。
performSelector(inBackground:) 和 performSelector(onMainThread:) 这两种方法更好用一些,因为更加简单,只要决定是放在main thread,还是background上运行就行。
(初步用下来,performSelector会有些问题,莫名的警告之类的,可能更推荐使用DispatchQueue.global()/DispatchQueue.main之类的吧)
示例代码:
1 | performSelector(onMainThread: #selector(showError), with: nil, waitUntilDone: false) |
This is an Objective-C call, so the @objc attribute is required.
这里发现个情况,几种代码的情况竟然都是可以的:
场景是,一个class ViewController: UITableViewController内定义了fun tableView的实现,这时候,需要在background中对tabaleView中的UI数据进行更新,肯定是要在主线程即main thread中更新的,
我们可以:
1 | DispatchQueue.main.async { |
也可以:
1 | // 这里写self?是因为在DispatchQueue.global().async这个closure中,里面引用的外部self必须是个optional,这里请忽略 |
竟然还可以:
1 | self?.tableView.performSelector(onMainThread: #selector(UITableView.reloadData), with: nil, waitUntilDone: false) |
没想到的是,#selector(UITableView.reloadData)中的“UITableView.”竟然也是可以引用到这个方法的,一时半会儿有点概念不清晰,但又感觉可能可以。
DispatchWorkItem – dispatch queue 或 dispatch group 下的运行单元
定义:
A DispatchWorkItem encapsulates work to be performed on a dispatch queue or a dispatch group. It is primarily used in scenarios where we require the capability of delaying or canceling a block of code from executing.
为什么需要DispatchWorkItem,而不是直接在DispatchQueue.global()/DispatchQueue.main中直接定义要运行的代码?
因为DispatchWorkItem可以为后续停止该DispatchWorkItem埋下伏笔。
在开始或运行该DispatchWorkItem之前,你都可以cancel掉或delay掉。
示例代码1:
1 | class Controller { |
以上代码的使用场景,比如用户在注册用户名时,当用户输入时,下一个输入字符超过多少时长的情况下,程序就会将该输入的字符放松到服务器进行校验;若在规定时间内输入了,由于有workItem?.cancel(),所以就会取消校验,等下次用户的输入超时的情况。
示例代码2:
1 | class MainViewController: UIViewController { |
以上代码,若正常运行,且用户未执行usedTheApp方法,则会在4秒后执行该DispatchWorkItem;但若4秒内用户执行了usedTheApp方法,则该DispatchWorkItem不会被执行到,因为被cancel()掉了。
DispatchWorkItem 的 notify() 和 perform()
DispatchWorkItem 的 Notify() 的作用是:
一个DispatchWorkItem可以指定一个特殊的workItem,使用DispatchWorkItem的Notify()来实现。当DispatchWorkItem执行完毕后,这个特殊的workItem会接着执行,像是一个执行的序列一样:
示例代码3:
1 | class Controller { |
newWorkItem执行完的同时,将会执行notify中的内容,而DispatchWorkItem的perform()是同步执行的,并非异步执行。
DispatchWorkItem 的 perform()
Perform():Executes the work item’s block synchronously on the current thread.
1 | let worker = DispatchWorkItem { [weak self] in |
DispatchWorkItem 的 wait()
DispatchWorkItem的wait()的作用,是由某个DispatchWorkItem来阻塞(block)这个thread,直到这个DispatchWorkItem执行完毕。
示例代码4:
1 | class Controller { |
但并不推荐使用wait(),因为会在执行时造成阻塞。
非常非常奇怪:
为何示例代码4代码中,DispatchQueue.global().async(execute: newWorkItem)换成xxxx.main.xxx,在playground中就会停止运行也未报错。
这是为何?
UICollectionView
https://www.hackingwithswift.com/read/10/2/designing-uicollectionview-cells
在Storyboard上创建UIColletionView的过程,与创建UITableView差不多,也是在删除原有的controller,在libraries里拖拉出一个Collection View Controller拖进storyboard。
接下来要建立一个对应UICollectionViewCell的Cocoa Touch Class的文件,在storyboard中找到CollectionViewCell(就如同找到table cell一样),让其的class对应该协议,此外要给该CollectionViewCell的identifier取个名字,好在代码中生成这个cell。
IndexPath(item: Int, section: Int)
let indexPath = IndexPath(item: 1, section: 0)
需要实现的方法
override func collectionView(_ collectionView: UICollectionView, numberOfItemsInSection section: Int) -> Int { }
示例代码:
1 | override func collectionView(_ collectionView: UICollectionView, numberOfItemsInSection section: Int) -> Int { |
override func collectionView(_ collectionView: UICollectionView, cellForItemAt indexPath: IndexPath) -> UICollectionViewCell {}
示例代码:
1 | override func collectionView(_ collectionView: UICollectionView, cellForItemAt indexPath: IndexPath) -> UICollectionViewCell { |
可以实现的方法
override func collectionView(_ collectionView: UICollectionView, didSelectItemAt indexPath: IndexPath) { }
示例代码1:
1 | override func collectionView(_ collectionView: UICollectionView, didSelectItemAt indexPath: IndexPath) { |
示例代码2:
1 | override func collectionView(_ collectionView: UICollectionView, didSelectItemAt indexPath: IndexPath) { |
collectionView.cellForItem(at: IndexPath) – 取得collectionView中指定的cell
具体用法见上面的例子。
func collectionView(_ collectionView: UICollectionView, layout collectionViewLayout: UICollectionViewLayout, sizeForItemAt indexPath: IndexPath) -> CGSize { }
要求处理collectionView的delegate给每个collectionView设置指定的layOut,比如说大小等。
Asks the delegate for the size of the specified item’s cell.
如果你不使用本方法来定义,则collectionView就会使用默认的itemSize,那么如何改变默认尺寸的值呢,应该是在storyBoard中设置Collection View、cell的尺寸以及Collection View Flow Layout的具体数值。
见图: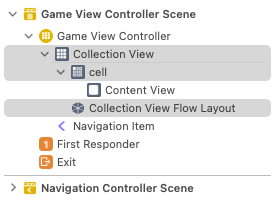
在代码中查看itemSize的办法:
1 | let layout = collectionView.collectionViewLayout as? UICollectionViewFlowLayout |
这样的话,能够查看了,虽然上述代码也改变了itemSize的值,但却发现没有效果。是不是一定要用到下面collectionView的sizeForItemAt方法来实时变更itemSize的值?
看一下某个例子中的代码:
1 | extension GameViewController: UICollectionViewDelegateFlowLayout { |
上面方法中,cardSize.getCardSize方法是自定义的用来计算尺寸的方法,此外,还多了一个flag就是currentCardSizeValid,为何要设置这个,因为多少个cell,就会计算多少次尺寸,为了节约资源,毕竟每个cell应该都是一样大小的(应该会有例外的情况),这时候只要沿用而不是重复计算才是最好的。
cardSize.getCardSize(collectionView: collectionView)的具体代码实现见下面。
如何更好地计算collectionCell的图片的合适大小
场景是:
比如给到图片的大小(这就能算到图片的比例),又给到34的排放顺序(43也是可以的,需要计算哪个更划算),这时候就需要根据屏幕是横屏还是竖屏,来最终决定图片的实际大小,也就是collectionCell的最终大小。
具体见文件 CardSize.swift,以及如何分配横竖排的关系的文件Grids.swift和Grid.swift。
UIImagePickerController
This new class is designed to let users select an image from their camera to import into an app. When you first create a UIImagePickerController, iOS will automatically ask the user whether the app can access their photos.
注意:使用UIImagePickerController不需要取得用户的同意,因为它是整个被UIKit掌控的,iOS知道我们不会去滥用它,所以不需要取得用户的许可。
privacy permission
查看、使用用户的照片,需要对用户进行告知:
we need to add a text string describing our intent. So, open Info.plist, select any item, click +, then choose the key name “Privacy - Photo Library Additions Usage Description”. Give it the value “We need to import photos” then press return.
一般示例代码
1 | // 先由一个按钮引出 |
用户选择照片后,会自动运行到一个方法:
1 | func imagePickerController(_ picker: UIImagePickerController, didFinishPickingMediaWithInfo info: [UIImagePickerController.InfoKey : Any]) { |
其中,info参数是一个dict,它有两个参数,分别是 .editedImage (the image that was edited) or .originalImage , but in our case it should only ever be the former unless you change the allowsEditing property.
UIImagePickerController实例的.sourceType
.sourceType 可取值 UIImagePickerController.camera, 表示从camera中拍照并取得照片。
但前提还得去判断是否开放该功能:UIImagePickerController.isSourceTypeAvailable(.camera)
1 | // 先判断用户是不是允许从camera中拍摄并取得照片 |
详细的实现代码可供参考:
1 | // viewDidLoad()中的代码 |
SpriteKit
(According to the project 11 from “100 hundred days of Swift”)
Create a new project in xCode and choose Game, sets its Game Technology to be Spritekit.
坐标系统的不同
1.UIKit的物体坐标都是基于一个view的左上角为起点的,而SpriteKit是基于物体的中心点。
2.UIKit的坐标系Y:0是基于屏幕的上边沿,而SpriteKit是基于屏幕的下边沿。
GameScene.sks 是类似于Interface Builder的
双击打开GameScene.sks,就打开了Scene Editor,这图形界面类似于Interface Builder。
SKScene
当建立一个project是基于Game的,那么GameScene.swift文件的GameScene这个class就是基于SKScene协议的。
didMove(to:) 类似于viewDidLoad()
在里面写入代码:
1 | override func didMove(to view: SKView) { |
override func didMove(to view: SKView) { }
这个类似于viewDidLoad方法。
override func update(_ currentTime: TimeInterval) { }
The update() method is called once every frame, and lets us make changes to our game.
Try not to do too much work, because it can slow your game down.
override func touchesBegan(_ touches: Set, with event: UIEvent?) { }
1 | override func touchesBegan(_ touches: Set<UITouch>, with event: UIEvent?) { |
override func touchesEnded(_ touches: Set, with event: UIEvent?) {}
Tells the responder when one or more fingers raised from a view or window.
override func touchesMoved(_ touches: Set, with event: UIEvent?) { }
测试下来,跟touchesBegan一样的用法,只是它只在触摸屏幕并移动时,才会被触发。
touchesMoved() is called when an existing touch changes position.
SKSpriteNode 类似于各个主页面的节点
建立一个正方形:
1 | SKSpriteNode(color: UIColor.red, size: CGSize(width: 64, height: 64)) |
建立一个基于image文件的图形:
1 | SKSpriteNode(imageNamed:) |
好像不能直接建立一个圆形,是不是先要做一个圆形出来,随后再基于该圆形设计出该SKSpriteNode?
待后续碰到了再补充吧…
但下面代码中ball.physicsBody = SKPhysicsBody(circleOfRadius: ball.size.width / 2.0)就可以设计出一个圆形的物理属性来。
SKSpriteNode.texture -> SKTexture(imageNamed:)
class called SKTexture, which is to SKSpriteNode sort of what UIImage is to UIImageView – it holds image data, but isn’t responsible for showing it.
1 | // 之前设定的charNode是一个SKSpriteNode,显示的是图片"penguinGood" |
Changing the character node’s texture like this is helpful because it means we don’t need to keep adding and removing nodes. Instead, we can just change the texture to match what kind of penguin this is, then change the node name to match so we can do tap detection later on.
SKSpriteNode(texture:)
可以直接用SKTexture生成SKSpriteNode,而不需要再设置SKSpriteNode的texture:
1 | // 先设置SKTexture |
SKSpriteNode.colorBlendFactor = 1 && SkSpriteNode.color = .red
Only SKSpriteNode has a colorBlendFactor property !!!
SKSpriteNode.colorBlendFactor是一个CGFloat,从0.0到1.0,代表与原材质的颜色的混同程序,0.0代表颜色不会改变,就是原材质,1.0代表可以完全改变原材质的颜色。
1 | let firework = SKSpriteNode(imageNamed: "rocket") |
SKShapeNode
SKShapeNode是SpriteKit的一个class,它可以让你在Game中方便且快捷地画出随意的图形,比如画圆形、线、长方形,之前接触到的就是使用贝塞尔图形来画画,在Project23中,水果忍者游戏中用来切水果划屏幕的那条线,它的容器就是SKShapeNode。
SKShapeNode有一个属性叫path,是用来描绘我们想要画的图形的。当path为nil,就什么都不画了;当path被设置为一个有效的路径的话,就可以按照SKShapeNode的设置来画图形了。
另外,SKShapeNode期望的path是一个CGPath属性,而我们使用UIBezierPath.cgPath就能够符合这一要求了。
1 | let shape = SKShapeNode() |
水果忍者中那条划过屏幕的线
代码太多,还是看教程中的代码,读一遍就懂了。
https://www.hackingwithswift.com/example-code/games/how-to-create-shapes-using-skshapenode
SKPhysicsBody属性
感觉是给 场景 或 节点 添加物理属性范围的。
1 | // box虽然有两个框架,就是上面设置的正方形 |
还能添加圆形的球以及圆形的物理属性范围,
以及使用到 .resitution 的反弹属性,值范围为0-1的小数。
1 | let ball = SKSpriteNode(imageNamed: "ballRed") |
设计一个有物理属性但不会跟着动的东西,简单说就是,我造了个东西,这东西被撞了却不会动,但撞它的其他东西会被弹开:
这里使用到了 .isDynamic :
1 | let bouncer = SKSpriteNode(imageNamed: "bouncer") |
SKPhysicsBody(texture: <#T##SKTexture#>, size: <#T##CGSize#>)
之前都是SKPhysicsBody(circleOfRadius),或者SKPhysicsBody(rectangleOf: <#T##CGSize#>)来定义,虽然对生成SKPhysicsBody的效率会有很大的提高,但有时候需要让该物体的每个pixel都作为SKPhysicsBody的时候,就需要用到SKPhysicsBody(texture: <#T##SKTexture#>, size: <#T##CGSize#>),虽然会降低效率,但有时是有必要的。
SpriteKit can create pixel-perfect collision detection by examining the pixels in a sprite’s texture.
1 | // let sprite = SKSpriteNode(imageNamed: "enemy") |
节点的physicsBody?.categoryBitMask属性
碰撞的时候,需要识别碰撞体,最简单的方式,是给节点设置一个name的值,但也可以给节点的physicsBody?.categoryBitMask添加值,这里的bit可以理解为是位运算的意思。
注意:UInt8,UInt16,UInt32,UInt64 分别表示 8 位,16 位,32 位 和 64 位的无符号整数形式。
比如:
1 | // 设置物理体的标示符 <<左移运算符 左移一位,相当于扩大2倍 |
具体的例子见 ontactTestBitMask && collisionBitMask 知识点。(会带上上面的四个标识符一起使用)
节点的physicsBody?的velocity速度属性
可设置该节点的速度,比如在touchesBegan方法中,当用户点击屏幕,就对速度进行更改:
1 | override func touchesBegan(_ touches: Set<UITouch>, with event: UIEvent?) { |
节点的physicsBody?的applyImpulse方法
在 “节点的physicsBody?的velocity速度属性”知识点的例子中已经出现。
这里还有一个例子:
1 | // 给香蕉一个自转速度和顺时针方向 |
节点的physicsBody?的angularVelocity属性
angularVelocity 是指自身旋转的速度。
1 | // sprite.physicsBody = SKPhysicsBody(texture: sprite.texture!, size: sprite.size) |
节点的physicsBody?的angularDamping属性
angularDamping 是指减少自身旋转的速度。
1 | // sprite.physicsBody = SKPhysicsBody(texture: sprite.texture!, size: sprite.size) |
节点的physicsBody?的linearDamping属性
linearDampin 是指减少linear上的移动速度。
1 | // sprite.physicsBody = SKPhysicsBody(texture: sprite.texture!, size: sprite.size) |
节点的physicsBody?的usesPreciseCollisionDetection属性
注意:Precise collision detection should be used rarely, and only generally with small, fast-moving objects.
1 | banana = SKSpriteNode(imageNamed: "banana") |
示例游戏中,旋转的香蕉会撞向大楼,具体撞击的点会把大楼轰出一个半圆出来,这时候使用usesPreciseCollisionDetection属性,感觉是让返回的撞击点更加精确。
SKScene的physicsWorld属性
SKScene的physicsWorld.gravity–重力属性
其实感觉不能叫重力属性,因为你可以设置成各个方向都有引力。
self.physicsWorld.gravity是CGVector数据类型。
1 | self.physicsWorld.gravity = CGVector(dx: 0.0, dy: -3.0) |
以上代码,代表x方向没有正引力也没有负引力,y方向有3个负引力。
SKScene的physicsWorld.contactDelegate 代理
物理世界的碰撞检测代理一般都设置为场景自己:
1 | self.physicsWorld.contactDelegate = self |
此时场景需要遵循 SKPhysicsContactDelegate 的代理协议。
SKAction
SKAction.setTexture()
给予SKNode一个新的Texture,目的是为了在SKAction.sequence中有一个动画效果。
例如:
1 | banana.physicsBody?.angularVelocity = -20 |

SKAction.rotate
先加载一个图形:
1 | var slotGlow: SKSpriteNode = SKSpriteNode(imageNamed: "slotGlowGood") |
是这个样子的:
我们要让它沿着中心点始终在转:
1 | // 如何运动: |
SKAction.moveBy(x:y:duration:)
移动位置及持续时间。
1 | // charNode = SKSpriteNode(imageNamed: "penguinGood") |
SKAction.wait(forDuration:)
等待。以秒计算。
1 | let delay = SKAction.wait(forDuration: 0.25) |
SKAction.animate(with: <#T##[SKTexture]#>, timePerFrame: <#T##TimeInterval#>)
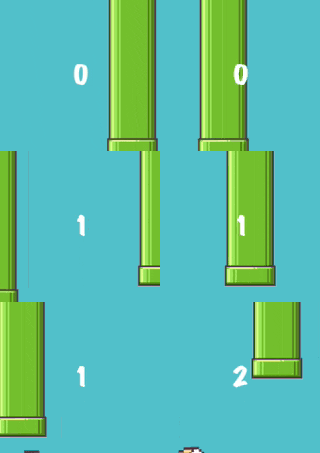
比如做一个小鸟飞翔的动画,可以拿到的小鸟的照片分别是bird-01/bird-02/bird-03,图像分别是:


代码是:
1 | // bird = SKSpriteNode(imageNamed: "bird-01") |
SKAction.run(block:)
SKAction.run(block:) will run any code we want, provided as a closure. “Block” is Objective-C’s name for a Swift closure.
1 | let notVisible = SKAction.run { [unowned self] in self.isVisible = false } |
为何要用SKAction.run来执行这段代码,而不是直接去执行呢?
感觉是因为类似下面的SKAction.sequence()需要依序执行action和改变一些属性的情况。
SKSpriteNode.run(<#T##action: SKAction##SKAction#>, withKey: <#T##String#>)
这里出现一个withKey参数,可以这么设置:
1 | bird.run(SKAction.repeatForever(anim), withKey: "fly") |
如果要停止这个动画,就可以使用到:
1 | bird.removeAction(forKey: "fly") |
还有一个让SKLabelNode显示的文字瞬间变大又还原的案例:
1 | scoreLabelNode.run(SKAction.sequence([SKAction.scale(to: 1.5, duration: TimeInterval(0.1)), SKAction.scale(to: 1.0, duration: TimeInterval(0.1))])) |
SKSpriteNode.removeAction(forKey: <#T##String#>)
紧接着上面的例子,用法是:
1 | bird.removeAction(forKey: "fly") |
SKAction.sequence()
SKAction.sequence() takes an array of actions, and executes them in order. Each action won’t start executing until the previous one finished.
1 | func hit() { |
SKAction.group()
An action group specifies that all actions inside it should execute simultaneously.
这里要注意的一点是,SKAction.group()内的SKAction,是同时执行的,所以我们平时可以配合SKAction.sequence()一起使用,但要注意两者的明显不同之处。
1 | let scaleOut = SKAction.scale(to: 0.001, duration: 0.2) |
背景闪电的案例
使用到 SKAction.sequence() / SKAction.run / SKAction.wait / SKScene.run
效果图: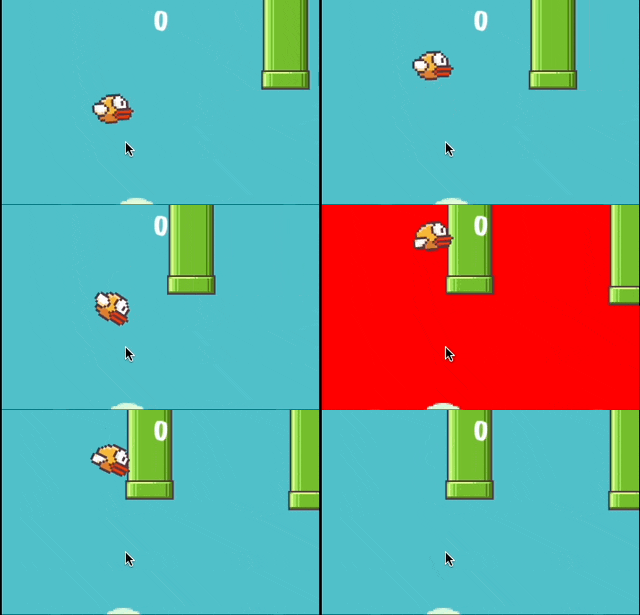
1 | // var skyColor = SKColor(red: 81.0/255.0, green: 192.0/255.0, blue: 201.0/255.0, alpha: 1.0) |
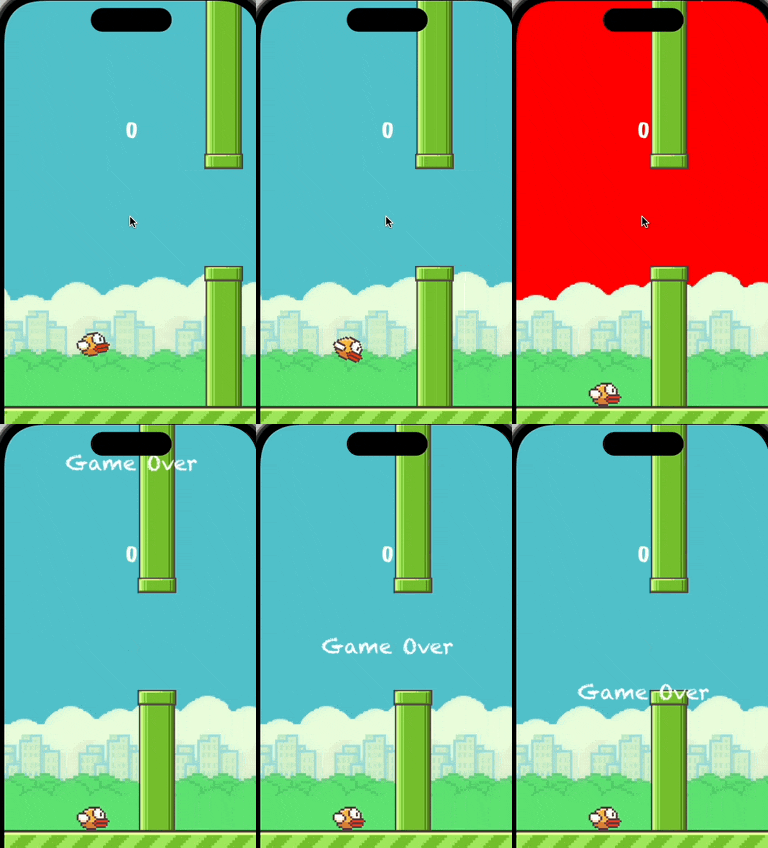
“Game Over” 字样从天而降 的案例
使用到SKScene的默认Bool属性isUserInteractionEnabled,值为true。
以下例子是在游戏结束的瞬间:
1、玩家不能点击屏幕;
2、Game Over 字样从天而降;
3、玩家此时才能点击屏幕得到响应。
1 | //lazy var gameOverLabel: SKLabelNode = { |
SKAction.playSoundFileNamed()
SKAction.playSoundFileNamed()是在SKAction中用来播放声音的。
The three main sound file formats you’ll use are MP3, M4A and CAF, with the latter being a renamed AIFF file. AIFF is a pretty terrible file format when it comes to file size, but it’s much faster to load and use than MP3s and M4As, so you’ll use them often.
1 | run(SKAction.playSoundFileNamed("whackBad.caf", waitForCompletion: false)) |
这里是直接run,其实是因为func是在GameScene中,所以可以直接用run。而若你是在其他SKNode中,个人认为是可以使用SKNode.run()的。
注意:这里的run不同于SKAction.run(block:)
SKaction.follow(<#T##CGPath#>, asOffset: <#T##Bool#>, orientToPath: <#T##Bool#>, speed: <#T##CGFloat#>)
意思是action是跟随者着CGPath的路径进行。
1 | let path = UIBezierPath() |
给这个node设置了一个SKAction,这个SKAction是跟随这贝塞尔曲线(但上面确实直线,应该是跟上面的path有关系)运动。
The follow() method takes three other parameters, all of which are useful. The first decides whether the path coordinates are absolute or are relative to the node’s current position. If you specify asOffset as true, it means any coordinates in your path are adjusted to take into account the node’s position.
The third parameter to follow() is orientToPath and makes a complicated task into an easy one. When it’s set to true, the node will automatically rotate itself as it moves on the path so that it’s always facing down the path. Perfect for fireworks, and indeed most things! Finally, you can specify a speed to adjust how fast it moves along the path.
SKPhysicsContactDelegate
SKPhysicsContactDelegate协议 就类似于针对物理碰撞的处理器,所以一般都是符合SKScene协议的class(比如例子里就是GameScene) 需要另外去遵循的:
1 | class GameScene: SKScene, SKPhysicsContactDelegate { |
此外,在didMove(to:)中我们需要添加的:
1 | override func didMove(to view: SKView) { |
contactTestBitMask && collisionBitMask
The collisionBitMask bitmask means “which nodes should I bump into?” By default, it’s set to everything, which is why our ball are already hitting each other and the bouncers. The contactTestBitMask bitmask means “which collisions do you want to know about?” and by default it’s set to nothing. So by setting contactTestBitMask to the value of collisionBitMask we’re saying, “tell me about every collision.”
- The categoryBitMask property is a number defining the type of object this is for considering collisions.
- The collisionBitMask property is a number defining what categories of object this node should collide with,
- The contactTestBitMask property is a number defining which collisions we want to be notified about.
两者的默认设置值是什么?
collisionBitMask的默认值是”everything”,contactTestBitMask的默认值是”nothing”。所以,能得出结论是,两者会碰撞,但永远收不到碰撞的相关通知。
所以下面的代码:
1 | ball.physicsBody!.contactTestBitMask = ball.physicsBody!.collisionBitMask |
ball.physicsBody!.collisionBitMask代表 球 的所有碰撞情况,前半句ball.physicsBody!.contactTestBitMask的意思是,哪些是需要进行上报的碰撞。
整个连起来就是,每个球的所有碰撞都得上报碰撞事件。
下面是一个完整的关于多个物体碰撞的例子:
1 | // 设置物理体的标示符 <<左移运算符 左移一位,相当于扩大2倍 |
给每个物理体设置physicsBody?.categoryBitMask的标识符:
1 | // 给地面添加一个识别 |
给所有对于鸟可能发生的碰撞进行定义:
1 | bird.physicsBody?.collisionBitMask = worldCategory | pipeCategory | scoreCategory |
给所有对于鸟来说需要上报通知的碰撞进行定义:
1 | bird.physicsBody?.contactTestBitMask = worldCategory | pipeCategory | scoreCategory |
以上是对鸟可能发生的碰撞以及需要上报通知的定义,你完全可以去定义 地面/管道/得分墙 的可能发生的碰撞以及需要上报通知的情况,
毕竟这里代码参考的文章中就是这么写的。
https://www.jianshu.com/p/bc22ee0f87b4
但觉得没必要,你只要定义鸟的collisionBitMask和contactTestBitMask部分就可以了,如果遇到更复杂的情况,倒是可以对类似 地面/管道/得分墙 进行细节上的再定义。
所以当碰撞发生的时候就可以去判断:
1 | func didBegin(_ contact: SKPhysicsContact) { |
但是,这样设置还是出现了问题,问题就是,当鸟撞上了得分墙了以后,它就被堵在了那里不能动了,所以鸟的collisionBitMask和contactTestBitMask都要去除scoreCategory:
1 | bird.physicsBody?.collisionBitMask = worldCategory | pipeCategory |
但是去除后,就不会有和得分墙的碰撞,也就无法产生得分了。
这时候就要在得分墙上动脑筋了:
1 | contactNode.physicsBody?.contactTestBitMask = birdCategory |
对于鸟的碰撞,contactNode需要去通知汇报碰撞情况,而此时因为鸟是被动一方,所以继续畅通无阻地通过这堵得分墙。
对于这个问题,总结一点,就是鸟设置的碰撞排除掉空气墙,而空气墙设置的碰撞要针对鸟,这样就行了。
设置了contactTestBitMask,但没设置collisionBitMask,会发生什么?
实际没有操作过,教程中称两者不会有碰撞反应,但两者相交的时候会告知。
contactTestBitMask / collisionBitMask / categoryBitMask 三个属性的建议定义格式
SpriteKit希望我们使用UInt32格式来定义上面三个属性。
一般定义的用例:
1 | enum CollisionTypes: UInt32 { |
定义了上述三个属性,如何使用?
直接使用CollisionTypes.player来赋值可以吗?显然不行,因为它的值是player,而非SpriteKit要求的UInt32属性的值1。因此,需要用到CollisionTypes.player.rawValue。
1 | let node = SKSpriteNode(imageNamed: "block") |
func didBegin(_ contact: SKPhysicsContact) {
这是SKPhysicsContactDelegate默认会有的一个方法。
如果发生碰撞并上报事件了,就会调用该方法:
1 | // 之前要给需要的SKSpriteNode节点取名字,比如 |
SKLabelNode
The SKLabelNode class is somewhat similar to UILabel in that it has a text property, a font, a position, an alignment, and so on.
1 | // 创建一个SKLabelNode,字体使用"粉笔灰" |
open func nodes(at p: CGPoint) -> [SKNode]
这方法是SKNode协议下的一个内置方法,作用是反馈在这个location的所有SKNode节点
1 | override func touchesBegan(_ touches: Set<UITouch>, with event: UIEvent?) { |
1 | override func touchesMoved(_ touches: Set<UITouch>, with event: UIEvent?) { |
SKEmitterNode
https://www.hackingwithswift.com/read/11/7/special-effects-skemitternode
SpriteKit has a built-in particle editor to help you create effects like fire, snow, rain and smoke almost entirely through a graphical editor.
The SKEmitterNode class is new and powerful: it’s designed to create high-performance particle effects in SpriteKit games, and all you need to do is provide it with the filename of the particles you designed and it will do the rest.
SKEmitterNode(fileNamed:)的用例
1 | func destroy(ball: SKNode) { |
就会有在ball被清除前,先出现一个爆炸的动画。
在xCode中你可以点击该FireParticles.sks文件,就可以看见右侧面板上有标题叫”SpriteKit Particle Emitter”,可以在里面更改动画效果等。
SKEmitterNode的advanceSimulationTime(sec: TimeInterval)
让SKEmitterNode提前多少秒渲染。
用例:
1 | starField = SKEmitterNode(fileNamed: "starfield")! |
效果是这样的:
你会发现星空是从右边屏幕开始慢慢渲染的,但我们需要星空一开始就充满屏幕,这时候就需要用到SKEmitterNode的advanceSimulationTime(sec: TimeInterval)。
1 | // 提前渲染10秒的星空 |
效果是这样的:
.sks文件的制作
还没涉及到.sks文件的制作,上例中,文件制作完预览是这样的: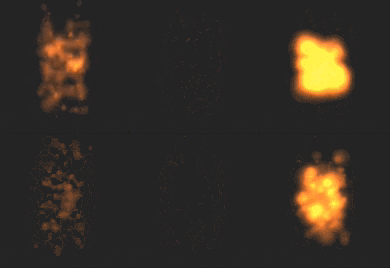
文章中提了一笔如何创建该sks文件:
Add a new file, but this time choose “Resource” under the iOS heading, then choose “SpriteKit Particle File” to see the list of options.
后续需要研究下怎么制作……………………….
SKNode
SKNode doesn’t draw images like sprites or hold text like labels; it just sits in our scene at a position, holding other nodes as children.
SKSpriteNode, SKLabelNode and SKEmitterNode, and they all come from SKNode.
1 | class WhackSlot: SKNode { |
SKNode.removeAllChildren()
移除SKNode中的所有子节点。
1 | // var pipes: SKNode! |
SKNode.children – 获取所有节点
children可以获取到所有的节点,它的定义是: [SKNode]。
下面是获取到所有节点,并始终刷新,判断节点的x坐标在屏幕左侧-300的位置时,即将其删除的例子:
1 | override func update(_ currentTime: TimeInterval) { |
isUserInteractionEnabled 属性 – 是否让用户点击交互
一个SKNode,如果只是做背景之类不需要用户点击进行交互的话,就可以:
1 | // skNode: SKNode |
speed – property
speed is the property that all spritekit nodes can have.
你可以把speed属性理解成时间的乘数,当它是1.0的时候是正常的默认值,也就是实际的正常时间,而当你把它设置成2.0时,就能把时间设置成比正常时间快两倍。
当我们把speed设置成0时,所有的children都会变成静止的状态。
SKCropNode
SKCropNode is a special kind of SKNode subclass that uses an image as a cropping mask: anything in the colored part will be visible, anything in the transparent part will be invisible.
SKCropNode是SKNode的子类。
SKCropNode.maskNode得是个SKSpriteNode。
SKCropNode.maskNode的作用就是:
在SKCropNode.maskNode范围内,这是前提,
SKCropNode这个node中的texture(素材),必须是要出现在maskNode范围内的才会显示。
示例:
1 | class WhackSlot: SKNode { |
解释下代码:
cropNode的位置在(0,15), cropNode.maskNode 是一张图片,可以理解成是cropNode的背景图,但实施其是一个人mask,在mask内的显示,不在的不显示。
charNode的位置在(0,-90),它在 cropNode.maskNode 的下面,所以不显示这个charNode。
后续会有代码让charNode往上升,就能看到了,不过这是后话。
I hope you noticed the important thing, which is that the character node is added to the crop node, and the crop node was added to the slot. This is because the crop node only crops nodes that are inside it, so we need to have a clear hierarchy: the slot has the hole and crop node as children, and the crop node has the character node as a child.
AnchorPoint
在SpriteKit的游戏开发中经常会使用到AnchorPoint锚点这一属性,这需要配合position属性一起使用。
在SpriteKit中(0,0)这个点是在左下角,但UIKit中是左上角。
锚点的类型是CGPoint类型数据,取值范围是(0,0)~(1,1)之间,如下图: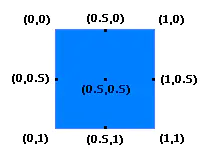 。
。
我们以(0,0)为左上角来讲解:
View的position为(50,50):
1、 若AnchorPoint为(0.5,0.5), 就说明锚点取的是View的中心点, 则View的中心点位置是(50,50), 如下图: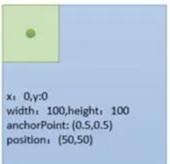
2、若AnchorPoint为(0,0),就说明锚点取的是View的左上角,则View的左上角位置是(50,50),如下图: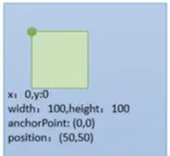
3、若AnchorPoint为(1,1),就说明锚点取的是View的右下角,则View的右下角位置是(50,50),如下图: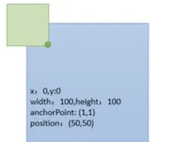
UIViewController 与 GameScene 的关系
https://www.hackingwithswift.com/read/29/3/mixing-uikit-and-spritekit-uislider-and-skview
默认建立game后,会有GameScene.swift和GameViewController.swift这两个文件,要解释一下的是,GameViewController.swift中的UIViewController,掌管着GameScene.swift中的GameScene。
我们一般采用的方式是,让两者互相通信,即可互相引用,但有一个强弱关系,GameViewController中的属性指向GameScene是一个强引用,而GameScene中的属性指向GameViewController的是一个弱引用,防止内存占用崩溃的情况。比如这样:
1 | // GameScene.swift |
这样设置后,两者就可以正常通信了。
UIViewController的默认方法
override func motionBegan(_ motion: UIEvent.EventSubtype, with event: UIEvent?) { } 检测设备的 晃动/shake/摇晃 效果
motionBegan()只能在view controller中设置,而不能在game scenes中设置。
下面是在GameViewController.swift的UIViewController中建立一个方法,来调用GameScene.swift中的explodeFireworks方法:
1 | class GameViewController: UIViewController { |
注:在模拟器中使用”ctrl”+”cmd”+”z”来模拟设备的晃动效果。
如何在游戏中新生成GameScene,以及在此过程中与GameViewController.swift之间的联系
在游戏中,比如玩家输掉的情况下,需要重新生成GameScene的场景,如果去做呢?
因为GameScene是由GameViewController来控制生成的,所以最终还是由后者来决定。
结合上面讲到的GameScene与GameViewController互相之间强弱引用自见的关系,具体见UIViewController 与 GameScene 的关系。
简单代码如下:
1 | // 以下代码在GameScene中运行 |
在spriteKit中使用UIGraphicsImageRenderer生成图像的注意点
先看例子:
1 | class GameScene: SKScene { |
在手机中生成的图像是这样的:![]()
总结:
- SpriteKit中的坐标是以左下角为(0,0),而UIGraphicsImageRenderer是以左上角为(0,0)的;
- SpriteKit中的图形的坐标都是以图形的中心点为准的,比如上面的整个图形的坐标是(100,100),所以整个图形是生成在屏幕的左下脚,而在UIGraphicsImageRenderer中制作图形时,图形的左上角才是(0,0),比如大红正方形的坐标是(0,0),圆形的坐标也是(0,0),绿色小正方形的坐标是(100,100)。
- 两者使用不同的图形原点,所以在制图时要考虑到你是在哪个里面,是还在UIGraphicsImageRenderer中作画呢,还是已经跳出到SpriteKit中开始生成图形了。
ctx.cgContent.setBlendMode() 方法 – 展现炸掉上层图像的效果
基于上面一样的例子,这里背景色设定为白色,先看效果图:
1 | // 其他代码一样 |
SKTransition
SKTransition的定义是A transition style from one scene to another.
SKTransition.crossFade 与 SKTransition.doorway
都是让scene消失掉的过渡过程,例子具体见如何在游戏中新生成GameScene,以及在此过程中与GameViewController.swift之间的联系这一节。
SKAudioNode
SKAudioNode is good because it lets us stop the audio whenever we want.
One of the neat features of SKAudioNode is that it loops its audio by default. This makes it perfect for background music: we create the music, add it directly to the game scene as a child, and it plays our background music forever.
1 | var backgroundMusic: SKAudioNode! |
NSCoding
https://www.hackingwithswift.com/read/12/3/fixing-project-10-nscoding
一般都推荐使用Codable了,所以这里就不写关于NSCoding的笔记了。
UISlider
如何取得滑动值
1 | // 在storyboard上建立一个slider |
如何跟踪滑动值的改变
1 | // 在storyboard上建立对应该Slider的action事件 |
还有跟踪值变化的方法,就是下面对valueChanged改变的响应事件的方法。
UISlider的基本属性
1 | // 最小值 |
UISlider 与 animation 的配合使用
具体见UIViewPropertyAnimator的fractionComplete属性 -- 配合UISlider的使用这一章节的笔记。
CoreImage
Core Image is Apple’s high-speed image manipulation tookit. It does only one thing, which is to apply filters to images that manipulate them in various ways.
需要import
1 | import CoreImage |
CIContext
The first is a Core Image context, which is the Core Image component that handles rendering. We create it here and use it throughout our app, because creating a context is computationally expensive so we don’t want to keep doing it and it’s best to re-use them where possible.
1 | var context: CIContext! |
具体的例子见下面的CIFilter的讲解。
CIFilter
https://www.hackingwithswift.com/read/13/4/applying-filters-cicontext-cifilter
(以上有多种filter的选择,对应值的转换,以及项目实际模拟出来的各种效果,如果需要的时候可以看一下)
(也可以在用户导入照片的时候,提供必要的filter让其修改下照片效果等)
The second is a Core Image filter, and will store whatever filter the user has activated. This filter will be given various input settings before we ask it to output a result for us to show in the image view.
1 | var currentFilter: CIFilter! |
UIImageWriteToSavedPhotosAlbum()
向用户的相册写入图片。
1 | // 假设有一个UIButton的action是下面的func |
UIView.animate
一般用法:
1 | UIView.animate(withDuration: <#T##TimeInterval#>, delay: <#T##TimeInterval#>, animations: <#T##() -> Void#>) |
更丝滑的用法:(使用到了usingSpringWithDamping / initialSpringVelocity,是为了增加润滑度的)
1 | UIView.animate(withDuration: <#T##TimeInterval#>, delay: <#T##TimeInterval#>, usingSpringWithDamping: <#T##CGFloat#>, initialSpringVelocity: <#T##CGFloat#>, animations: <#T##() -> Void#>) |
案例:
1 | UIView.animate(withDuration: 1, delay: 0, usingSpringWithDamping: 0.5, initialSpringVelocity: 5, options: [], animations: { |
UIView.animate 的 completed 的trailing closure参数
下面的代码可以在animate的动画结束之后再执行一段代码。
1 | UIView.animate(withDuration: 1, delay: 0, options: [], animations: { |
UIView.animate 的思考
上面代码中,在UIView.animate中变化的是self.imageView.alpha。
同样的情景,但换做是一个UIButton,”_ sender: UIButton”是其传来的参数,你使用sender.isHidden = true, 是不会有过渡变化的,而你使用sender.alpha = 0,就会带来过渡的变化。后者很好理解,因为alpha的取值是从0-1.0之前,但为什么sender.isHidden从false到true,也是让图像从有到无,为何就没有用呢? (还记得在SwfitUI中,withAnimation中好像是可以放入true或false的改变的,也会有动画效果的)
教程中是这么讲的,”because isHidden is either true or false, it has no animatable values between.”
上面代码还用到了backgroundColor,是不是颜色从一种到另一种,其中是带有值的过渡的,所以也是可行的。
使用需要是weak等去除强引用?没必要!
For the animations closure we don’t need to use [weak self] because there’s no risk of strong reference cycles here – the closures passed to animate(withDuration:) method will be used once then thrown away.
UIViewPropertyAnimator – 类似于withAnimation
不同于UIView.animate,因为感觉它只能针对这个UIView,而UIViewPropertyAnimator使用方式类似于withAnimation。
看一下例子:
1 | let redBox = UIView(frame: CGRect(x: -64, y: 0, width: 128, height: 128)) |

UIViewPropertyAnimator的addCompletion方法
再增加点特效,存在过去和回来以及旋转的效果:
1 | let redBox = UIView(frame: CGRect(x: -64, y: 0, width: 128, height: 128)) |

UIViewPropertyAnimator的fractionComplete属性 – 配合UISlider的使用
UIViewPropertyAnimator的ffractionComplete属性是个CGFloat。
我们来使用UISlider来决定该动画的完成度(个人理解):
1 | // 定义一个UISlider |
当滑动UISlider的时候会出现的效果:
UIViewPropertyAnimator的stopAnimation(withoutFinishing: Bool)方法
即中止动画。
实例–点击卡牌后产生翻转动画的效果
1 | class ViewController: UIViewController { |
这里使用到了UIView.transition功能,具体用法有:
UIView.transition(with: UIView, duration: TimeInterval, options: UIView.AnimationOptions,animations: (() -> Void)?))UIView.transition(from: UIView, to: UIView, duration: Timeinterval)UIView.transition(from: UIView, to: UIView, duration: TimeInterval, options: UIView.AnimationOptions)
三种使用的方法,稍有不同。第一种在上例中已经展现。后两种在一些情况下可以使用,因为不能像第一种一样设置with参数,所以不能特别指定是哪个view有动画,只能默认是整个view;如果在UICollectionView中的cell,cell中有一个占据整个篇幅的ImageView,那是可以使用后两种方法的。
CGAffineTransform
任何的UIView都可以使用CGAffineTransform。
一般用法案例:
1 | UIView.animate(withDuration: 1, delay: 0, usingSpringWithDamping: 0.5, initialSpringVelocity: 5, options: [], animations: { |
这里有两个知识点:
- UIView.transform 可更改外形、大小、角度等;
- UIView.transform = .identity 即可恢复原状。
CGAffineTransform还有的用法:
1 | // 位移 |
CGAffineTransform.identity
CGAffineTransform也有identity,作用是恢复到transform之前的状态。
MapKit
MKMapView及其的delegate
在一个UIView中建立了一个MKMapView后,需要让UIView作为这个MKMapView的delegate的话,需要在storyboard中ctrl-drag这个MKMapView到UIView上面,就会出现让你选择delegate的情况,选择好了以后就可以了。
原文是这样写的:
Using the assistant editor, please create an outlet for your map view called mapView. You should also set your view controller to be the delegate of the map view by Ctrl-dragging from the map view to the orange and white view controller button just above the layout area. You will also need to add import MapKit to ViewController.swift so it understands what MKMapView is.
Note: If you don’t set the map’s delegate, the rest of this project won’t work too well.
MKMapView的用例:
在storyboard上生成一个map kit view。
mapType 更改显示地图的样式
1 | // @IBOutlet var mapView: MKMapView! |
MKAnnotation – protocol
在地图上显示图钉。
遵循MKAnnotation协议的必须是class,不能是struct!!!
遵循MKAnnotation协议的情况下,必须要有一个coordinate: CLLocationCoordinate2D的声明,如下:
1 | class Capital: NSObject, MKAnnotation { |
在viewDidLoad()中可以生成这个annotation:
1 | let london = Capital(title: "London", coordinate: CLLocationCoordinate2D(latitude: 51.507222, longitude: -0.1275), info: "Home to the 2012 Summer Olympics.") |
随后在地图上显示这些annotation:
1 | // @IBOutlet var mapView: MKMapView! |
func mapView(_ mapView: MKMapView, viewFor annotation: MKAnnotation) -> MKAnnotationView? {
https://www.hackingwithswift.com/read/16/3/annotations-and-accessory-views-mkpinannotationview
Every time the map needs to show an annotation, it calls a viewFor method on its delegate. We don’t implement that method right now, so the default red pin is used with nothing special.
但首先要让View遵循 MKPinAnnotationView protocol :
1 | class ViewController: UIViewController, MKMapViewDelegate { |
接下来就是完成func mapView(_ mapView: MKMapView, viewFor annotation: MKAnnotation) -> MKAnnotationView? {
1 | func mapView(_ mapView: MKMapView, viewFor annotation: MKAnnotation) -> MKAnnotationView? { |
接下来就是每个annotation被点击后实现方法了:
1 | // calloutAccessoryControlTapped method can make the tapped button know to call it. |
实现效果是这样的: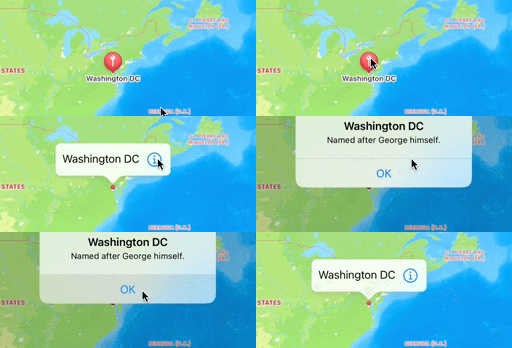
Timer
Timer.scheduledTimer(timeInterval: <#T##TimeInterval#>, target: <#T##Any#>, selector: <#T##Selector#>, userInfo: <#T##Any?#>, repeats: <#T##Bool#>)
多少个时间单位内(timeInterval), 执行什么代码(selector), 是否重复执行(repeats)。
After creating a Timer, it should be created using Timer.scheduledTimer() method to activate it.
1 | Timer.scheduledTimer(timeInterval: 0.35, target: self, selector: #selector(createEnemy), userInfo: nil, repeats: true) |
invalidate() – Timer.scheduledTimer的停止
让一个计时器停止:
1 | // var gameTimer: Timer? |
debug
1 | print("I'm inside the viewDidLoad() method!") |
assert
一般用法
两个参数,前面的条件不满足或是false,则显示预设的错误信息,并让测试时的程序崩溃。
1 | assert(1 == 1, "Maths failure!") |
breakpoints
- Fn+F6 – 到breakpoint处时,一行一行地执行
- Ctrl+Cmd+Y – 执行到下一个breakpoint
给Breakpoint加上条件
例如在循环中每十次进行一次breakpoint:
对着设定的breakpoint右键,跳出菜单中选择”edit breakpoint”,再跳出的菜单: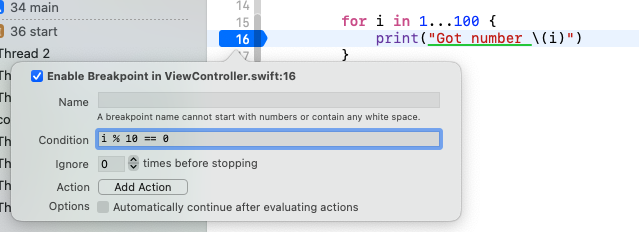
在Condition中输入”i % 10 == 0”即可。
Exception Breakpoint
Exception Breakpoint will be automatically triggered when an exception is thrown. Exceptions are errors that aren’t handled, and will cause your code to crash. With breakpoints, you can say “pause execution as soon as an exception is thrown,” so that you can examine your program state and see what the problem is.
Cmd+8 调出“Show the Breakpoint navigator”,左下角按”+”按钮,调出如下菜单,选择”Exception Breakpoint”: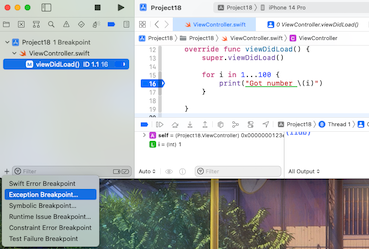
进行必要的设置: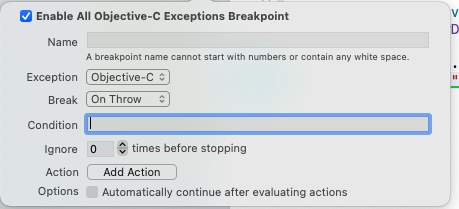
The next time your code hits a fatal problem, the exception breakpoint will trigger and you can take action.
下面的图就是当出现错误的情况时,会出现 NSException:
lldb窗口
LLDB is the default debugger in Xcode on macOS and supports debugging C, Objective-C and C++ on the desktop and iOS devices and simulator.
在运行project时,可以在菜单栏 View > Debug Area > Activate Console, 可以看到下面的lldb窗口:
命令行:
p – 同print,比如要打印变量i,”p i”即可。
View Debugging
在运行项目后,在代码页面, 菜单栏的 Debug -> View Debugging -> Capture View Hierarchy 。
如下图:
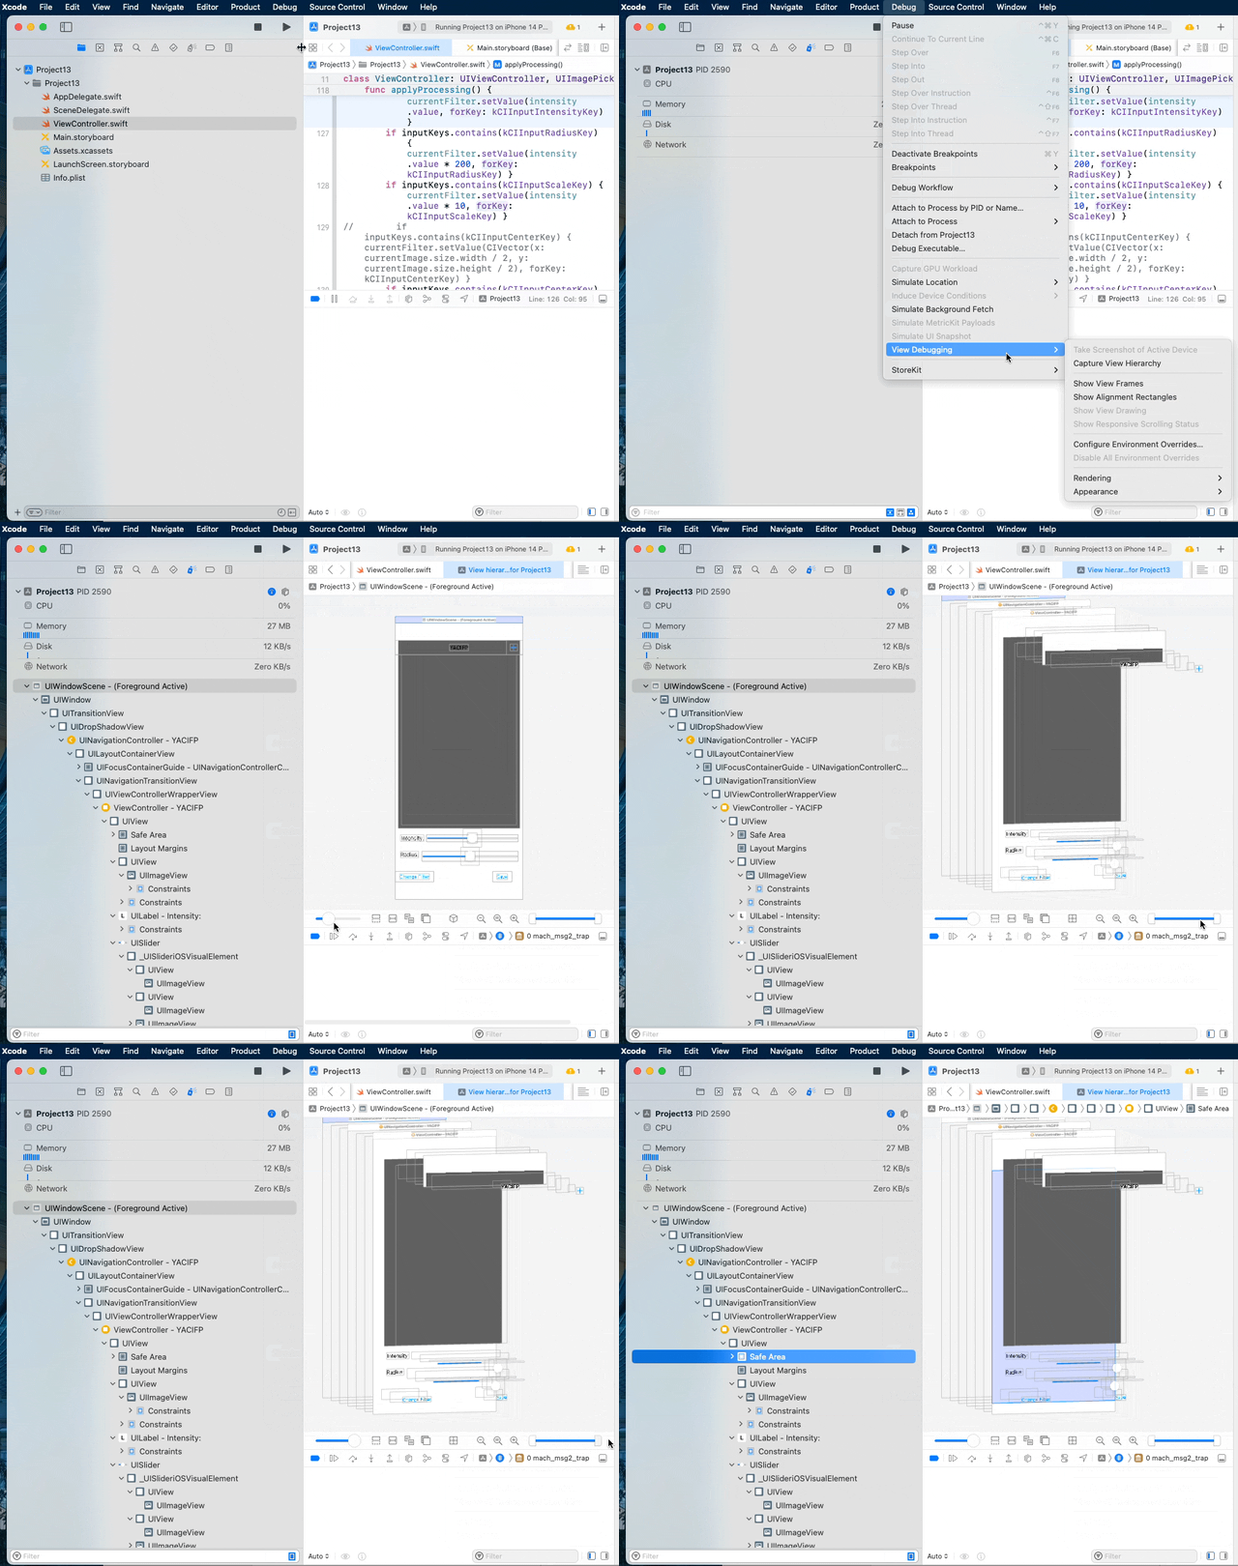
Here’s the clever part: if you click and drag inside the hierarchy display, you’ll see you’re actually viewing a 3D representation of your view, which means you can look behind the layers to see what else is there. The hierarchy automatically puts some depth between each of its views, so they appear to pop off the canvas as you rotate them.
This debug mode is perfect for times when you know you’ve placed your view but for some reason can’t see it – often you’ll find the view is behind something else by accident.
还可以使用下图中打红圈的快捷键打开 View Debugging:
CADisplayLink
https://www.hackingwithswift.com/example-code/system/how-to-synchronize-code-to-drawing-using-cadisplaylink
https://www.jianshu.com/p/5e8d783d377a
CADisplayLink是一个能让我们以和屏幕刷新率相同的频率将内容画到屏幕上的定时器。
我们在应用中创建一个新的 CADisplayLink 对象,把它添加到一个runloop中,并给它提供一个 target 和 selector 在屏幕刷新的时候调用。
CADisplayLink比NSTimer好的地方是,后者会有延迟,而CADisplayLink的好处是,我们不需要在格外关心屏幕的刷新频率了,因为它本身就是跟屏幕刷新同步的。
1 | let displayLink = CADisplayLink(target: self, selector: #selector(createEnemy)) |
代码在Project17上跑的通,但有些疑问,为什么CAFrameRateRange(minimum: 0.5, maximum: 0.5)的时候就会疯狂执行,而数值大于1以后,就会正常一些。
这个模块,以后要做动画游戏的时候需要好好研究一下。
笔记待后续补充。
info.plist
plist是property list的缩写,它包含了app、插件(extensions)的元数据(metadata),这些是关于:what language is it, what version number is it, and so on。
extension
safari extensions
https://www.hackingwithswift.com/100 Day67-69
p.s.(2023-1-28)这章节的内容实在是太乱了,新东西太多,后续还要再理一下,如果确实要写extension的话,最好结合上述网页上的实例再看。
safari extensions必须要在safari的action menu中才能启动,类似于: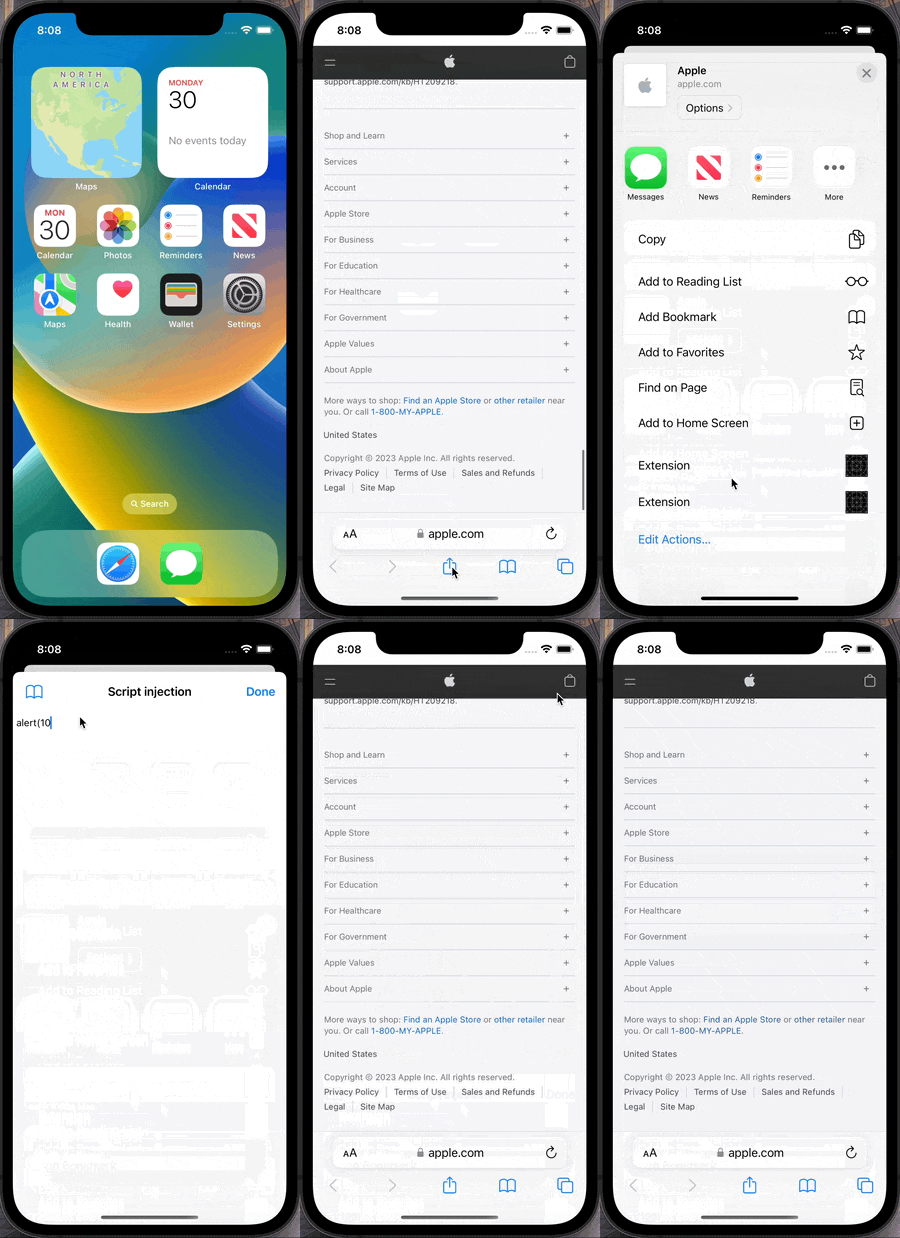
这个extension是植入到Safari中的,它需要safari才会有用,而不是像其他程序一样可以独立运行。
生成一个在原有项目下的extension:
Go to the File menu and choose New > Target. When you’re asked to choose a template, select iOS > Application Extension > Action Extension, then click Next. For the name just call it Extension(or other name whatever you want), make sure Action Type is set to “Presents User Interface”, then click Finish.
这样就在一个project中建立了一个extension,而我们给其取名”Extension”,最后我们在sfari的action menu中可以看到一个Extension的可点击项,上面图像中可以看到。
safari中就可以运行extension,安全性在哪里?
实际上,你的extension与safari是不会通信的,因为系统安全原因,而在这其中,iOS起到了一个中间桥梁的作用,iOS在其中安全地传递数据。
extensionContext:
母程序(parent app)就比如说你在safari里做了一个插件,那么这个safari就是母程序,插件就是extension。
当我们的插件被建立后,extensionContext是用来让我们控制与母程序交互的东西。
inputItems:
extensionContext?.inputItems是一个存有数据的数组,该数据是母程序发送给插件使用的。我们一般只关心第一个item,所以会写成extensionContext?.inputItems.first。
NSItemProvider:
母程序发送给我们的数据都被包装成了一个个NSItemProvider。我们的程序把所有的数组数据中的第一个取出,而这个被取出的数据应当是一个NSItemProvider。
1 | if let inputItem = extensionContext?.inputItems.first as? NSExtensionItem { |
接下来我们把inputItem中的所有attachments,只取出第一个attachment,代码就是:
1 | if let itemProvider = inputItem.attachments?.first { |
合起来的代码就是:
1 | if let inputItem = extensionContext?.inputItems.first as? NSExtensionItem { |
loadItem(forTypeIdentifier: )
loadItem(forTypeIdentifier: )是要求数据提供者真正地去提供这个item给我们。因为它使用到了一个trailing closure,所以执行的是异步程序,这个方法会持续执行,这是因为有时候这个item提供者可能忙于载入或者发送数据。在这个trailing closure中,我们需要使用到 [weak self]去避免强引用,此外,我们还需要接受两个参数,第一个是item提供者给我们的一个dictionary,另一个是发生的任何error。
1 | itemProvider.loadItem(forTypeIdentifier: kUTTypePropertyList as String) {[weak self] (dict, error) in |
先要说一下的是,在Action.js中的代码中有一段:
1 | // run及其代码的意思是: |
loadItem的trailing closure接收到这个dictionary并进行处理,这也是其是异步方法的愿意。
// do stuff中的代码依次是:
1 | guard let itemDictionary = dict as? NSDictionary else { return } |
NSDictionary是一个对我们来说是新的数据类型,但它来自旧时代的iOS代码,就把它看作是一个Swift中的dictionary吧。现在更多使用的是modern Swift dictionaries,而非NSDictionary。但这里NSDictionary是与插件配合使用的。
打印了一下上面的itemDictionary: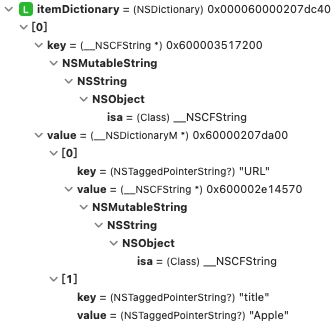
1 | guard let javaScriptValues = itemDictionary[NSExtensionJavaScriptPreprocessingResultsKey] as? NSDictionary else { return } |
这行代码中的key为NSExtensionJavaScriptPreprocessingResultsKey,这是从JavaScript中传递过来的数据的key。
如果你打印上面javaScriptValues的值,你会看到类似:
1 | { |
接下来就可以设置插件中的这两个后续我们要使用的属性了:
1 | self?.pageTitle = javaScriptValues["title"] as? String ?? "" |
完成代码是:
1 | if let inputItem = extensionContext?.inputItems.first as? NSExtensionItem { |
// do stuff中的代码是经过简单编写的,但建议自己去建立一个extension,看一下默认模版中是怎么遍历所有的items和providers,并最终找到第一张图片的。
info.plist内的设置:
先看一下设置后的info.plist内部的构成: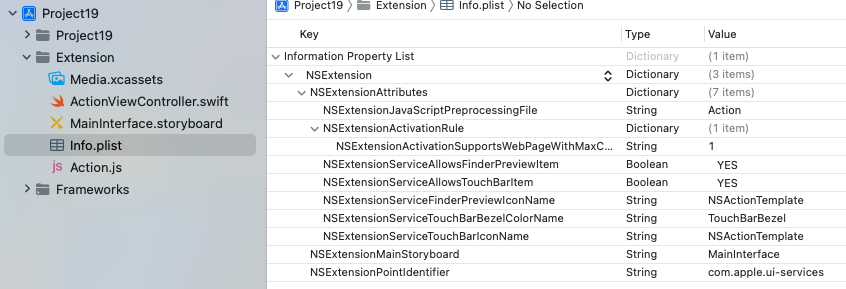
有一个Information Property List。因为我们这里是一个插件,所以该list里面有一个NSExtension。
这个NSExtension里面一般有三样东西:
NSExtensionAttributes, NSExtensionMainStoryboard and NSExtensionPointIdentifier.
这里我们只关心会改变我们的插件行为的NSExtensionAttributes。
我们设置的目的是:
一是设置接收的是什么数据,二是设置后期要执行的语言类型及具体文件名。
在NSExtensionAttributes下面有一个NSExtensionActivationRule,Type是”String”,值是”TRUEPREDICATE”,把它修改Type为Dictionary,在里面“+”一个item,名字为”NSExtensionActivationSupportsWebPageWithMaxCount”,Type为String,值设为1。把这个值加到新设的Dictionary里面,是因为我们只想要收到网页数据(web pages),而对images或其他数据类型不感兴趣。
接下来选择NSExtensionAttributes,在里面添加名为”NSExtensionJavaScriptPreprocessingFile”,Type为”String”,值为”Action”。这样设置,就是当插件被called的时候,我们需要运行JavaScript的预处理文件,文件名为Action.js。这样需要注意,这里你设置的值是”Action”而不是”Action.js”,因为iOS会帮我们把.js加上去的。
既然在info.plist中已经设置了要执行的”Action.js”文件,那么我们就要创建它:
Right-click on your extension’s Info.plist file and choose New File. When you’re asked what template you want, choose iOS > Other > Empty, then name it Action.js, and put this text into it:
1 | var Action = function() {}; |
There are two functions: run() and finalize(). The first is called before your extension is run, and the other is called after.
Apple expects the code to be exactly like this, so you shouldn’t change it other than to fill in the run() and finalize() functions.
设置到这里,我们在Project Navigator中可以看到的extenison是这样的: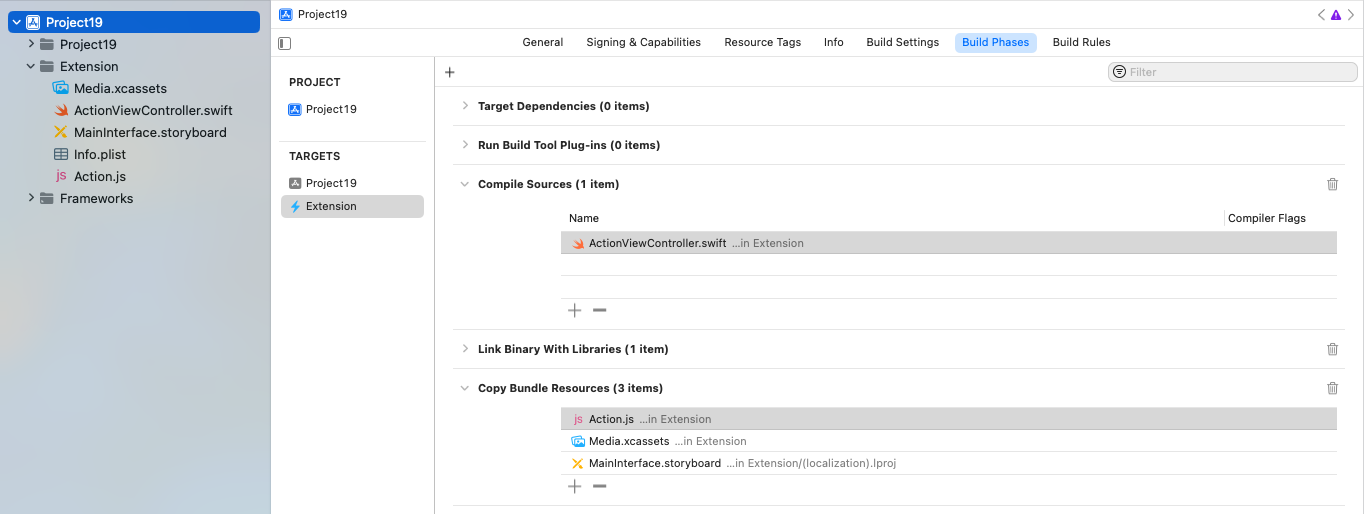
此外,在Build Phases的Compile Sources和Copy Bundle Resources中,应该是如上图这样,Action.js是在Copy Bundle Resources中,而不是在Compile Sources中。
最终的Action.js是这样的:
1 | var Action = function() {} |
在MainInterface.storyboard上建立一个UITextNode,让其auto layout,随后ctrl+drag让其在ActionViewController上对应属性:
1 | @IBOutlet var script: UITextView! |
在extension界面的右上角加一个执行的按钮:(注意extension界面只有在被调用到插件功能的时候才会启用)
1 | navigationItem.rightBarButtonItem = UIBarButtonItem(barButtonSystemItem: .done, target: self, action: #selector(done)) |
此时写下要执行的objc的方法:
1 | @objc func done() { |
可以观察一下:
1、之前我们从safari接收到的是一个含有NSExtensionItem元素的列表,而这里extensionContext?.completeRequest(returningItems: [item]),最终传回safari的也是一个含有NSExtensionItem元素的列表。
2、我们朝NSDictionary传递的key是NSExtensionJavaScriptFinalizeArgumentKey,对应的是Action.js的finalize方法,而之前我们一开始从safari取得的key是NSExtensionJavaScriptPreprocessingResultsKey,对应的是Action.js的run方法。
这样就能说得通了。I realize that seems like far more effort than it ought to be, but it’s really just the reverse of what we are doing inside viewDidLoad().
NotificationCenter
在我们的scenes背后,当有”键盘事件”、”应用进入后台”以及一些其他的事件,iOS会持续地向我们发出notification。我们可以对一些特定的notification加入observer进行回应,也可以进行数据的传递。
Fixing the keyboard
https://www.hackingwithswift.com/read/19/7/fixing-the-keyboard-notificationcenter
iOS上会有一个keyboard的问题:
比如我们现在有一个可以输入多行的UITextView: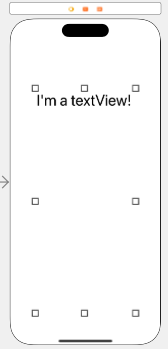
我们可以看出这个UITextView占据屏幕的大小。
如果我们执行,并调出键盘来一行行的打字,当打的字即将超过键盘所在的位置的时候,会发生什么事情呢?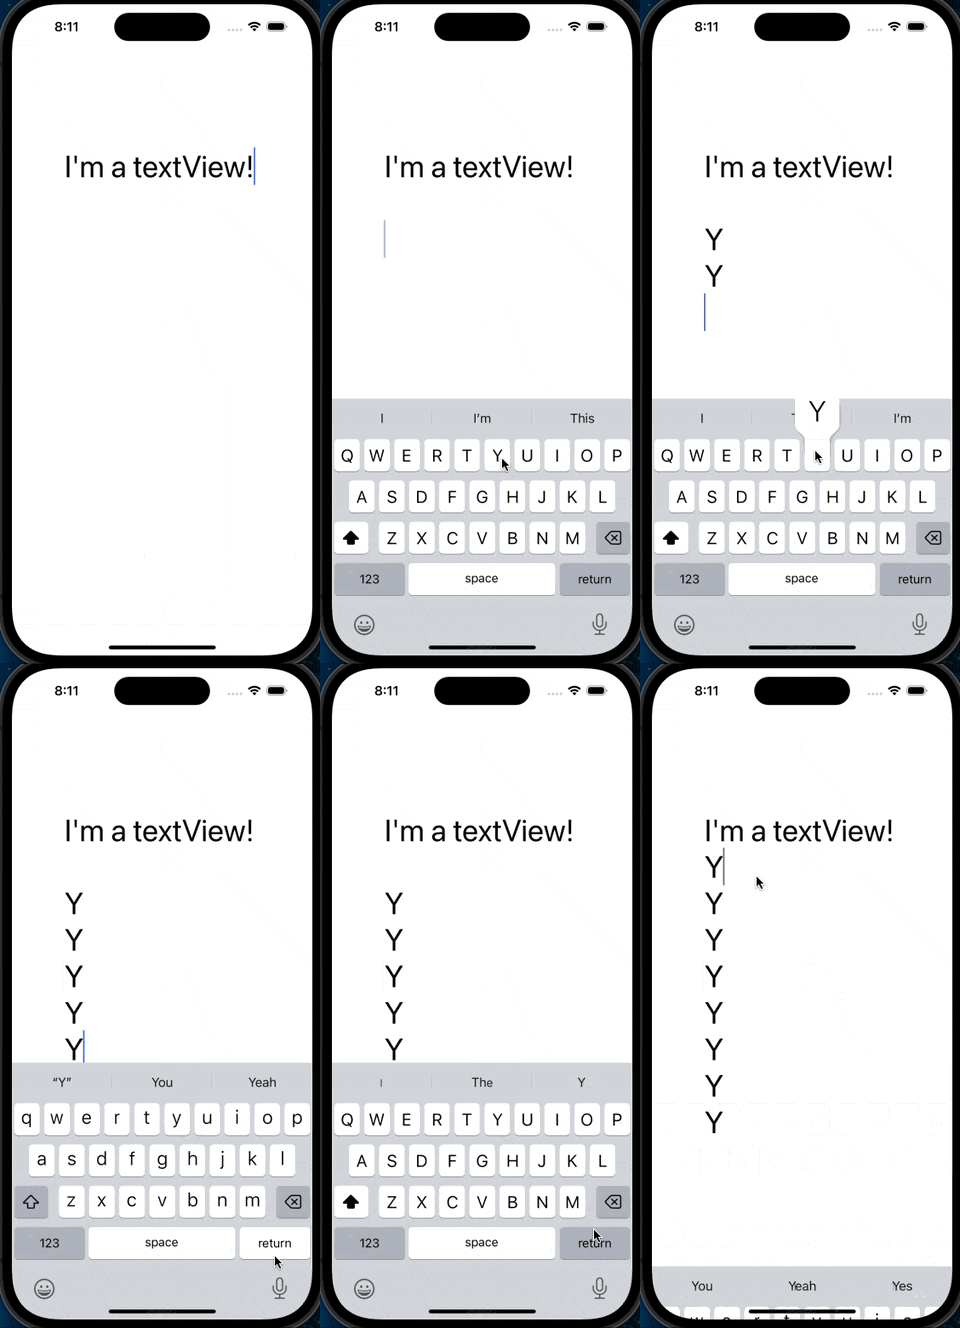
为什么会发生这样的事情?
因为当你调出keyboard的时候,这个textView的可使用面积没有自动去调整,仍旧那么大,就会出现打的字出现下键盘下方并被遮盖的情况。
keyboardWillHideNotification / keyboardWillChangeFrameNotification
当键盘隐藏不用的时候,系统会发出keyboardWillHideNotification。
当键盘隐藏不用、键盘状态发生改变(比如出现,或者屏幕从portrait专程landscape等等),系统都会发出keyboardWillChangeFrameNotification。
看上去keyboardWillChangeFrameNotification已经涵盖了keyboardWillHideNotification,但有时候一些奇怪的场景还是需要用到keyboardWillHideNotification的(现在还没有碰到过)。
添加对这两个键盘事件的观察:
1 | let notificationCenter = NotificationCenter.default |
对应的adjustForKeyboard方法:
1 | // @IBOutlet var textView: UITextView! |
再对scroll indicator进行设置:
1 | @objc func adjustForKeyboard() { |
NotificationCenter的post的传输自制的提醒
1 | let notificationCenter = NotificationCenter.default |
If no other part of your app has subscribed to receive that notification, nothing will happen. But you can make any other objects subscribe to that notification – it could be one thing, or ten things, it doesn’t matter. This is the essence of loose coupling: you’re transmitting the event to everyone, with no direct knowledge of who your receivers are.
NotificationCenter的UIApplication.willResignActiveNotification事件
当整个程序不再是active状态(即将进入background)之前会发生的事件。
1 | let notificationCenter = NotificationCenter.default |
UserNotifications – UN
看下来,UserNotifications就是在程序中设置好,取得用户授权后,在固定时间点或此后的一段时间后,给用户的手机系统发送提醒信息的一个模块。
If you want to use the UserNotifications framework, you should import it:
1 | import UserNotifications |
UNUserNotificationCenter.requestAuthorization – 获取用户授权
给用户发送提醒信息的权限,需要用户授权:
1 | let center = UNUserNotificationCenter.current() |
跳出来的是: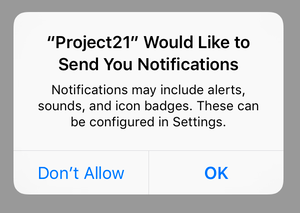
UNNotificationRequest(identifier:, content:, trigger:)
下面的代码设置的是TimeInterval的通知方式(UNTimeIntervalNotificationTrigger),5秒钟后,给系统发送通知信息,告知content中的内容:
1 | let center = UNUserNotificationCenter.current() |
也可以设置成Calendar的通知方式,每天10:30发送: (UNCalendarNotificationTrigger)
1 | let center = UNUserNotificationCenter.current() |
你也可以设置一个 地理围栏(geofence),它可以基于你的地理位置来发动(trigger)通知提醒。
五秒钟后发送是这样的:
Acting on responses – 根据用户点击选项来采取行动
https://www.hackingwithswift.com/read/21/3/acting-on-responses
UNNotificationAction UNNotificationCategory
使用UNNotificationAction和UNNotificationCategory,你可以针对跳出的提醒及用户的反应做出进一步的回应。
UNNotificationCategory对应的是上面我们设置的content.categoryIdentifier = “alarm”。
UNNotificationAction设置的是用户选择点击后作出的回应。
1 | let center = UNUserNotificationCenter.current() |
效果是这样的: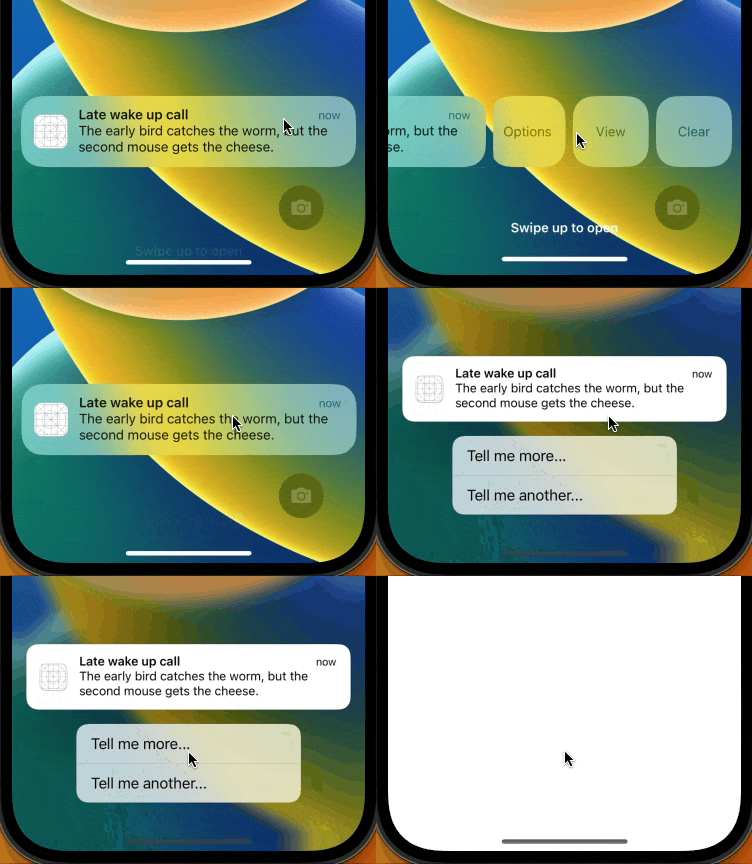
UNUserNotificationCenter的getNotificationSettings – 查看是否已获得用户的允许发送提醒
感觉下面这样写比较好,查看是否获得用户授权发提醒,若未获授权,则请求授权;若已授权,则进一步设置提醒的内容和方式:
1 | func manageNotifications() { |
didReceive – 处理上面设置的content.userInfo = [“customData”: “fizzbuzz”]等传输数据
UNUserNotificationCenterDelegate协议定义了userNotificationCenter方法,可以接收一个@escaping,来等待并处理传输的数据:
(这不是必须要定义的方法,只是在需要处理传输的数据的时候才有必要)
1 | userNotificationCenter:(UNUserNotificationCenter *)center didReceiveNotificationResponse:(UNNotificationResponse *)response withCompletionHandler |
我们可以这样定义该方法:
1 | func userNotificationCenter(_ center: UNUserNotificationCenter, didReceive response: UNNotificationResponse, withCompletionHandler completionHandler: @escaping () -> Void) { |
很有趣的是,它只响应center.setNotificationCategories,就是你只有点了”Tell me more…”或者”Tell me another…”按钮才会执行该方法,很奇怪,难道它只针对UNNotificationCategory,为啥?
center.setNotificationCategories的参数是[category],而category指向的actions是[show, show2, …],所以它只针对action来回应。
AVFoundation
使用AVFoudation模块的AVPlayer播放声音文件
在使用SpriteKit模块使用中,为何不使用其本身就有的SKAction.playSoundFileNamed()?
而是要去使用AVAudioPlayer(contentsOf: URL)?
教材中称是,AVAudioPlayer可以在你需要的时候,随时停止声音的播放。
基本使用方法:
1 | if let path = Bundle.main.url(forResource: "sliceBombFuse", withExtension: "caf") { |
你可以使用sound.stop()来停止播放。
AVAudioSession && AVAudioRecorder
the iOS way of recording audio from the microphone.
Recording audio in iOS uses two classes: AVAudioSession and AVAudioRecorder.
AVAudioSession is there to enable and track sound recording as a whole, and AVAudioRecorder is there to track one individual recording. That is, the session is the bit that ensures we are able to record, the recorder is the bit that actual pulls data from the microphone and writes it to disk.
具体的案例见下方网址:
https://www.hackingwithswift.com/read/33/2/recording-from-the-microphone-with-avaudiorecorder
audioRecorderDidFinishRecording方法 – AVAudioRecorder的默认结束方法
AVAudioRecorder不管成功与否,到结束的时候都会自动调用一个audioRecorderDidFinishRecording方法。
1 | func audioRecorderDidFinishRecording(_ recorder: AVAudioRecorder, successfully flag: Bool) { |
switch
@unknown default
There’s one final case in there to handle any unknown cases that crop up in the future. While we could have made one of the other cases handle that using a regular default case, in this project none of them really make sense for whatever might occur in the future so I’ve added a dedicated @unknown default case to handle future cases.
Multipeer Connectivity
AirDrop功能强大,但它与app的整合不够紧密。幸运的是,从iOS7开始引入了一个新的框架,就是Multipeer Connectivity。Multipeer Connectivity是建立在与AirDrop相同技术上的一个框架。它传输范围比蓝牙广,不依赖网络,但需要打开wifi或蓝牙。
具体的初步实现还是挺简单的,可以参考:
https://www.hackingwithswift.com/100/83
https://www.hackingwithswift.com/100/84
#if #else #endif
https://www.hackingwithswift.com/read/26/3/tilt-to-move-cmmotionmanager
上文有提到这些用法
示例代码:
1 | override func update(_ currentTime: TimeInterval) { |
上面的例子,自己总结下来,就是:
在模拟器上的时候,就只编译#if这部分代码,但如果是在真机的时候,就只编译#else部分的代码。
CoreMotion
All motion detection is done with an Apple framework called Core Motion.
CMMotionManager
Most of the work about motion detection is done by a class called CMMotionManager.
Using it here won’t require any special user permissions, so all we need to do is create an instance of the class and ask it to start collecting information.
We can then read from that information whenever and wherever we need to, and in this project the best place is update().
设备的移动等动作的检测,不需要得到用户的授权,无论何时何地我们都可以取得数据.
范例中,取得该数据的代码,最好的就是放在update()中:
1 | var motionManager: CMMotionManager! |
1 | override func update(_ currentTime: TimeInterval) { |
CMMotionManager 的 startAccelerometerUpdates
如上面代码有写到。
U sing the startAccelerometerUpdates() method, which instructs Core Motion to start collecting accelerometer information we can read later.
CMMotionManager 的 accelerometerData
如上面代码有写到。
就是取得设备移动等动作的数据。
Core Graphics
Core Graphics can work on a background thread – something that UIKit can’t do – which means you can do complicated drawing without locking up your user interface.
Remember: SpriteKit’s positions things from the center and Core Graphics from the bottom left!
CGFloat && CGPoint && CGSize && CGRect 的定义
- CGFloat – Always use this instead of Double or Float for anything to do with a UIView’s coordinate system.
- CGPoint – Simply a struct with two CGFloats in it: x and y. eg:
var point = CGPoint(x: 37.0, y: 55.2) - CGSize – Also a struct with two CGFloats in it: width and height . eg:
var size = CGSize(width: 100.0, height: 50.0) - CGRect – A struct with a CGPoint and a CGSize in it.
1
2
3
4
5struct CGRect {
var origin: CGPoint
var size: CGSize
}
let rect = CGRect(origin: aCGPoint, size: aCGSize) // there are other inits as well
UIGraphicsImageRenderer – class
That class name starts with “UI”, so what makes it anything to do with Core Graphics? Well, it isn’t a Core Graphics class; it’s a UIKit class, but it acts as a gateway to and from Core Graphics for UIKit-based apps like ours. You create a renderer object and start a rendering context, but everything between will be Core Graphics functions or UIKit methods that are designed to work with Core Graphics contexts.
UIGraphicsImageRenderer的image – function
1 | let renderer = UIGraphicsImageRenderer(size: CGSize(width: 512, height: 512)) |
上面例子中出现的 ctx.cgContext.setFillColor ctx.cgContext.setStrokeColor ctx.cgContext.setLineWidth ctx.cgContext.addRect ctx.cgContext.drawPath:
- setFillColor() sets the fill color of our context, which is the color used on the insides of the rectangle we’ll draw.
- setStrokeColor() sets the stroke color of our context, which is the color used on the line around the edge of the rectangle we’ll draw.
- setLineWidth() adjusts the line width that will be used to stroke our rectangle. Note that the line is drawn centered on the edge of the rectangle, so a value of 10 will draw 5 points inside the rectangle and five points outside.
- addRect() adds a CGRect rectangle to the context’s current path to be drawn.
- drawPath() draws the context’s current path using the state you have configured.
此外,再加一个fill():
- fill() fill() skips the add path / draw path work and just fills the rectangle given as its parameter using whatever the current fill color is.
比如下面的代码:
1 | let renderer = UIGraphicsImageRenderer(size: CGSize(width: 512, height: 512)) |
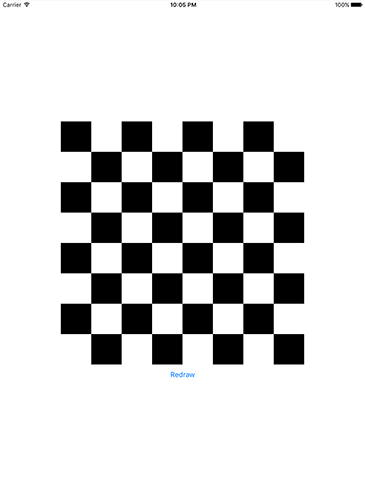
可以看到,使用ctx.cgContext.fill方法的时候,不需要像再上面的例子一样add path/draw path。
还有translateBy rotate(by:) strokePath:
- translateBy() translates (moves) the current transformation matrix. – The default behavior of rotating the CTM is to rotate from the top-left corner of our canvas.If you want to rotate from a different position you should add a translation first. – CTM is the current transformation matrix.
- rotate(by:) rotates the current transformation matrix.
- strokePath() strokes the path with your specified line width, which is 1 if you don’t set it explicitly.
可以画出的效果为:
代码是:
1 | let renderer = UIGraphicsImageRenderer(size: CGSize(width: 512, height: 512)) |
还有move(to:) addLine(to:)
可以呈现的效果是:
代码是:
1 | let renderer = UIGraphicsImageRenderer(size: CGSize(width: 512, height: 512)) |
使用NSAttributedString 以及 UIImage:
1 | // 1 |
解释一下上述6个步骤:
- Create a renderer at the correct size.
- Define a paragraph style that aligns text to the center. – Paragraph style also has options for line height, indenting, and more.
- Create an attributes dictionary containing that paragraph style, and also a font.
- Wrap that attributes dictionary and a string into an instance of NSAttributedString.
- Load an image from the project and draw it to the context.
- Update the image view with the finished result.

如何画出这个圆形的图形?(里面的字母忽略)
需要使用都clip()来修剪,不然就是一个长方形。
1 | let original = UIImage(contentsOfFile: path)! |
KeychainWrapper – class – 外部文件加载
我们一般使用UserDefaults在设备内存储普通信息,但有时需要存储相对敏感或是偏向私人的信息,在程序外一样可以读取到该UserDefaults的数据,所以为了不让他人从我们的手机数据中简单读取到,这时候就不建议使用UserDefaults了,而是使用KeychainWrapper这个外来的类。
但单单用KeychainWrapper来存储数据也不安全,最好是配合LA框架的TouchID和FaceID解锁程序更好。
要使用KeychainWrapper,先要在项目中放入两个文件,分别是:KeychainItemAccessibility.swift 和 KeychainWrapper.swift。这两个文件已放在extraFiles文件夹中。
KeychainWrapper.standard.set(_ value:String, forKey key:String ) – 存储数据
1 | KeychainWrapper.standard.set(secret.text, forKey: "SecretMessage") |
KeychainWrapper.standard.string(forKey: String) – 读取数据
1 | let text = KeychainWrapper.standard.string(forKey: "SecretMessage") ?? "" |
KeychainWrapper.standard.hasValue(forKey: String) – 判断是否有值
KeychainWrapper.standard.hasValue(forKey: passwordKey) 返回一个Bool
LocalAuthentication – framework 即 LA framework
import
1 | import LocalAuthentication |
Touch ID 和 Face ID
获得 Touch ID 和 Face ID 的用户授权以及去验证是否取得授权的大致步骤:
- 检查设备是否支持Touch ID 和 Face ID, 或者说用户有没有在系统中设置过Touch ID 和 Face ID;
- 如果有,请求Touch ID 和 Face ID的授权。 当我们请求的时候,给用户一串我们为何要请求的原因的符串。当请求Touch ID的时候,我们把原因写在代码中就可以了,但请求Face ID的时候,把原因的字符串写在Info.plist文件里面–加一个key -> “Privacy - Face ID Usage Description.”
- 当我们请求成功的时候,我们就可以做我们想做的事情了,比如解锁这个app;不然,我们就要展示错误信息了。
注意:系统使用TouchID或FaceID,并不是两者都需要,只是挑一种,有一种就可以通过了。
LAContext的canEvaluatePolicy()和evaluatePolicy()方法 / .deviceOwnerAuthenticationWithBiometrics – 请求的安全条款类型
1 | @IBAction func authenticateTapped(_ sender: Any) { |
Instruments – part of XCode
XCode中的Instruments,可以用来查看你的app的各种运行数据的工具。
Instruments的启动
Cmd + I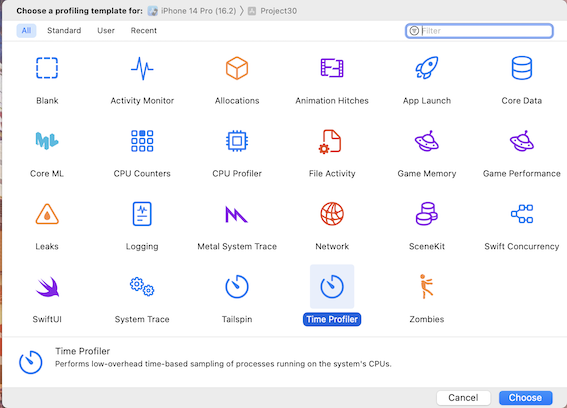
Time Profiler
是图形化测试app中每个耗时的组件。
https://www.hackingwithswift.com/read/30/3/what-can-instruments-tell-us
在Debug菜单下面,可选择两个比较有用的选项:Color Blended Layers和Color Offscreen-Rendered。
- Color Blended Layers shows views that are opaque in green and translucent in red. If there are multiple transparent views inside each other, you’ll see more and more red.
- Color Offscreen-Rendered shows views that require an extra drawing pass in yellow. Some special drawing work must be drawn individually off screen then drawn again onto the screen, which means a lot more work.
Broadly speaking, you want “Color Blended Layers” to show as little red as possible, and “Color Offscreen-Rendered Yellow” to show no yellow.
Allocations
The allocations instrument will tell you how many of these objects are persistent (created and still exist) and how many are transient (created and since destroyed).
图表里persistent代表建立后仍旧存在的数量,transient代表建立后销毁的数量。
UIStackView
从名字上也能看出来这是干什么的,就是view的容器。
在UIStackView中设置其所包含元素的排列方式
https://www.hackingwithswift.com/read/31/2/uistackview-by-example
看上面的这篇文章,就能对各个情形有所了解了。
UIStackView的distribution属性
对在UIStackView中的布局形式进行设置
1 | stackView.distribution = UIStackView.Distribution.fillEqually |
以上貌似是将在UIStackView中的所以子元素设置为相同间距的布局。
addArrangedSubview() – 在UIStackView中添加元素
在UIStackView中添加子元素,不能使用addSubview(),而是需要使用addArrangedSubview(),这里要注意了。
比如:
1 | // @IBOutlet var stackView: UIStackView! |
UIStackView的arrangedSubViews属性
可以用来显示UIStackView中的所有subViews。
比如:
1 | for view in stackView.arrangedSubviews { |
UIStackView的alignment属性
1 | stackView.alignment = .center |
UIStackView的axis属性
1 | stackView.axis = .vertical |
这样UIStackView中存储的views就会按照vertical来排列了。
CloudKit
需要注册一个开发者账号,所以还没有具体实践,后续如果需要写到,可以借鉴这个示例:
GameplayKit
GameplayKit is an object-oriented framework that provides foundational tools and technologies for building games. GameplayKit includes tools for designing games with functional, reusable architecture, as well as technologies for building and enhancing gameplay features such as character movement and opponent behavior.
- The
GKGameModelprotocol is used to represent the state of play, which means it needs to know where all the game pieces are, who the players are, what happens after each move is made, and what the score for a player is given any state. - The
GKGameModelPlayerprotocol is used to represent one player in the game. This protocol is so simple we already implemented it: all you need to do is make sure your player class has aplayerIdinteger. It’s used to identify a player uniquely inside the AI. - The
GKGameModelUpdateprotocol is used to represent one possible move in the game. For us, that means storing a column number to represent a piece being played there. This protocol requires that you also store a value integer, which is used to rank all possible results by quality to help GameplayKit make a good choice.
GKGameModelPlayer – Protocol
playerId – property
Identifier used by GKMinmaxStrategist differentiate players from one another.
var playerId: Int { get }
遵循GKGameModelPlayer,必须要实现playerId属性.
GKGameModel – protocol
func gameModelUpdates(for player: GKGameModelPlayer) -> [GKGameModelUpdate]? {}
func apply(_ gameModelUpdate: GKGameModelUpdate) {}
func copy(with zone: NSZone? = nil) -> Any {}
func setGameModel(_ gameModel: GKGameModel) {}
how about the AI works
ISO8601DateFormatter – 日期与字符串之间的转换
国际标准ISO 8601,是国际标准化组织的日期和时间的表示方法,全称为《数据元和交换格式信息交换日期和时间表示法》。
例如:
2023-07-28T22:31:35Z
ISO8601DateFormatter().string(from date: Date) -> String
从Date格式转换为String格式。
1 | let formatter = ISO8601DateFormatter() |
ISO8601DateFormatter().date(from string: String) -> Date?
从String格式转换为Date格式。
1 | let formatter = ISO8601DateFormatter() |
XCTest
CustomStringConvertible
CustomStringConvertible可以在结构体、 类、 枚举等类型中实现, 只要完成description属性的实现即可, 最终可以完成对前述类型转成制定String类型格式的转换。
1 | struct Point: CustomStringConvertible { |
IB – Interface Builder
@IBDesignable
@IBDesignable 可以让UIView实时在IB中显示,省去了执行任务后在模拟器上查看的步骤。
一般的用法:
1 | import UIKit |
@IBInspectable
@IBInspectable 可以让你在IB中实时更改某个属性,并在IB中显示更改过的情况。
一般的用法:
1 | import UIKit |
